Growing
Turmeric (Curcuma longa) Guide: Growing, Variants, Harvest and Storage
How to grow turmeric in the ground, a raised bed, a pot or a greenhouse, how to harvest and cure it, what is in a teaspoon, and what is inside the root, leaves and flower.
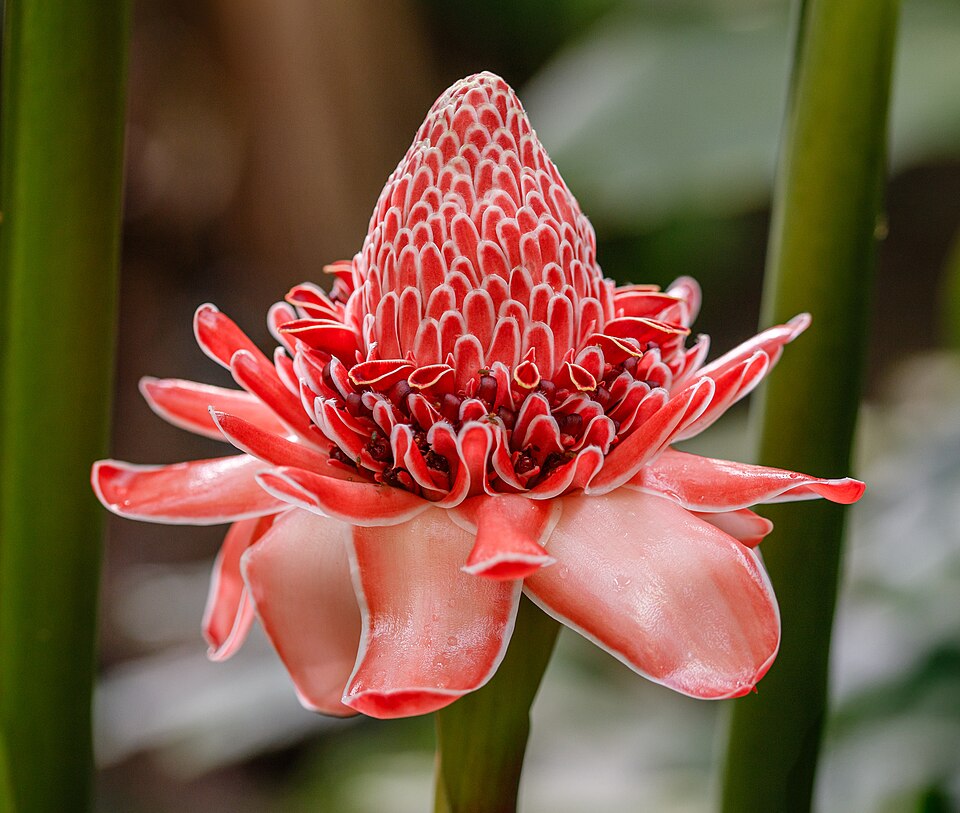
Photograph: Mokkie, CC BY-SA 4.0. Source: Wikimedia Commons
On this page
Introduction
A knob of turmeric from the grocery store is a planting piece. Set it in warm, damp soil in spring and by late fall it has multiplied into a clump of fresh orange root, with tall leaves above it that you can cook with too. Turmeric has been farmed for at least 4,000 years, it sits in the medicine chest and the spice rack on three continents, and it is one of the few kitchen spices you can grow from a single scrap.
Here is how the whole subject fits together: what the plant is and where it came from, six ways to grow it (in the ground, in raised beds, in pots, in a greenhouse, indoors, and from sprouts), how to harvest, cure and store the root, what a teaspoon of the spice gives you, and what is chemically inside the root, the leaves and the flower.
Summary
- Grow it: outdoors in zones 8 to 11, and in a pot, raised bed or greenhouse anywhere warmer than 10 °C (50 °F) at night.
- Time it: 8 to 10 months from planting to harvest, with the leaves yellowing when the root is ready.
- Eat it: a teaspoon carries real manganese and iron, and the root, leaves and flower are all edible.
- Use it: the curcuminoids and oils inside are what herbal extracts concentrate, and the guide shows how.
Store-bought turmeric is almost always dried and ground, which loses most of the volatile oil and the fresh, peppery edge. A plant in your own yard or on your own porch gives you the whole root, the leaves for wrapping and cooking, and a flower that most growers never see. It also gives you control over soil, handling and storage, which decides how much of the color and flavor survives.
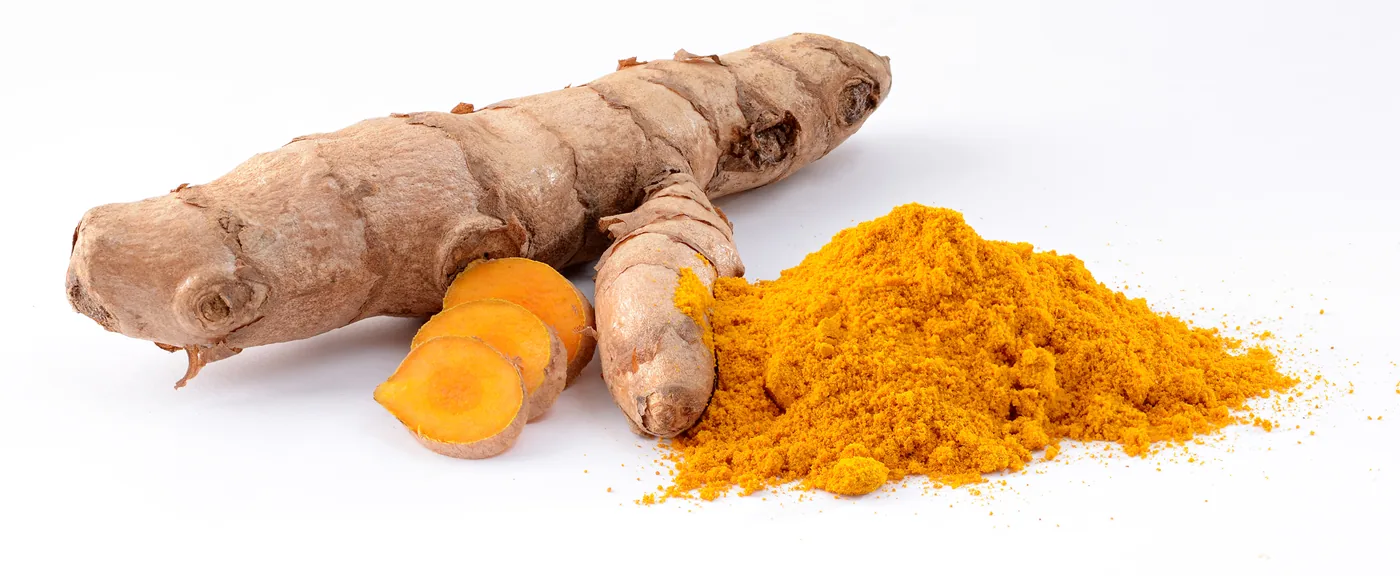
The orange is the reason people have fought over this plant for millennia. The sections below take it in the order you will meet it: the plant, the growing, the harvest, the kitchen, and the chemistry.
Complete guide to ginger cultivation covering Zingiber officinale growing parameters, rhizome propagation.
For a More In-Depth Read, Click HereWhat Turmeric Is and Where It Comes From
The plant and its root
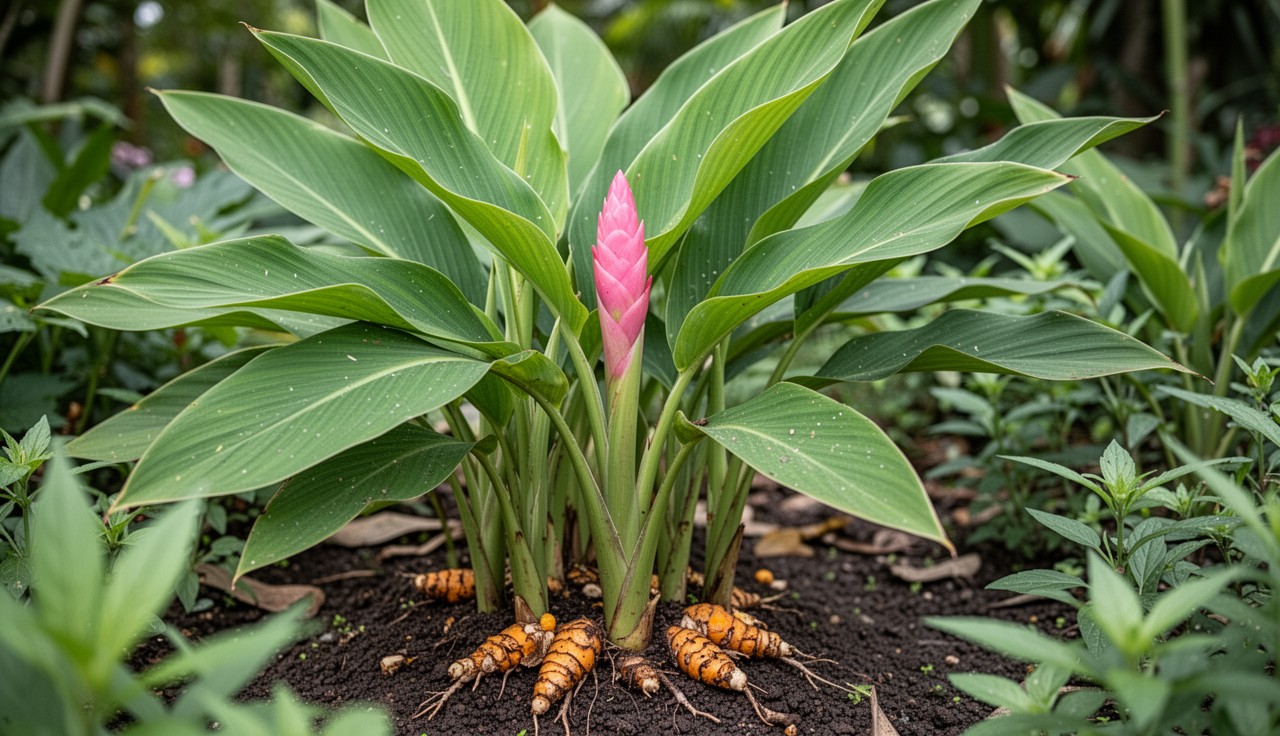
Turmeric is a tropical perennial in the ginger family. The part you use is the rhizome, a thick underground stem that branches into knobby fingers and turns a deep orange when cut. It stains cutting boards, countertops and fingers for days, so wear gloves when you harvest and process it.
Above ground the plant is a clump of large, paddle-shaped leaves that rise straight from the rhizome and reach about three feet tall. Turmeric rarely flowers in cultivation. When it does, it sends up a cone-shaped spike with pale flowers tucked between pink-to-green bracts.
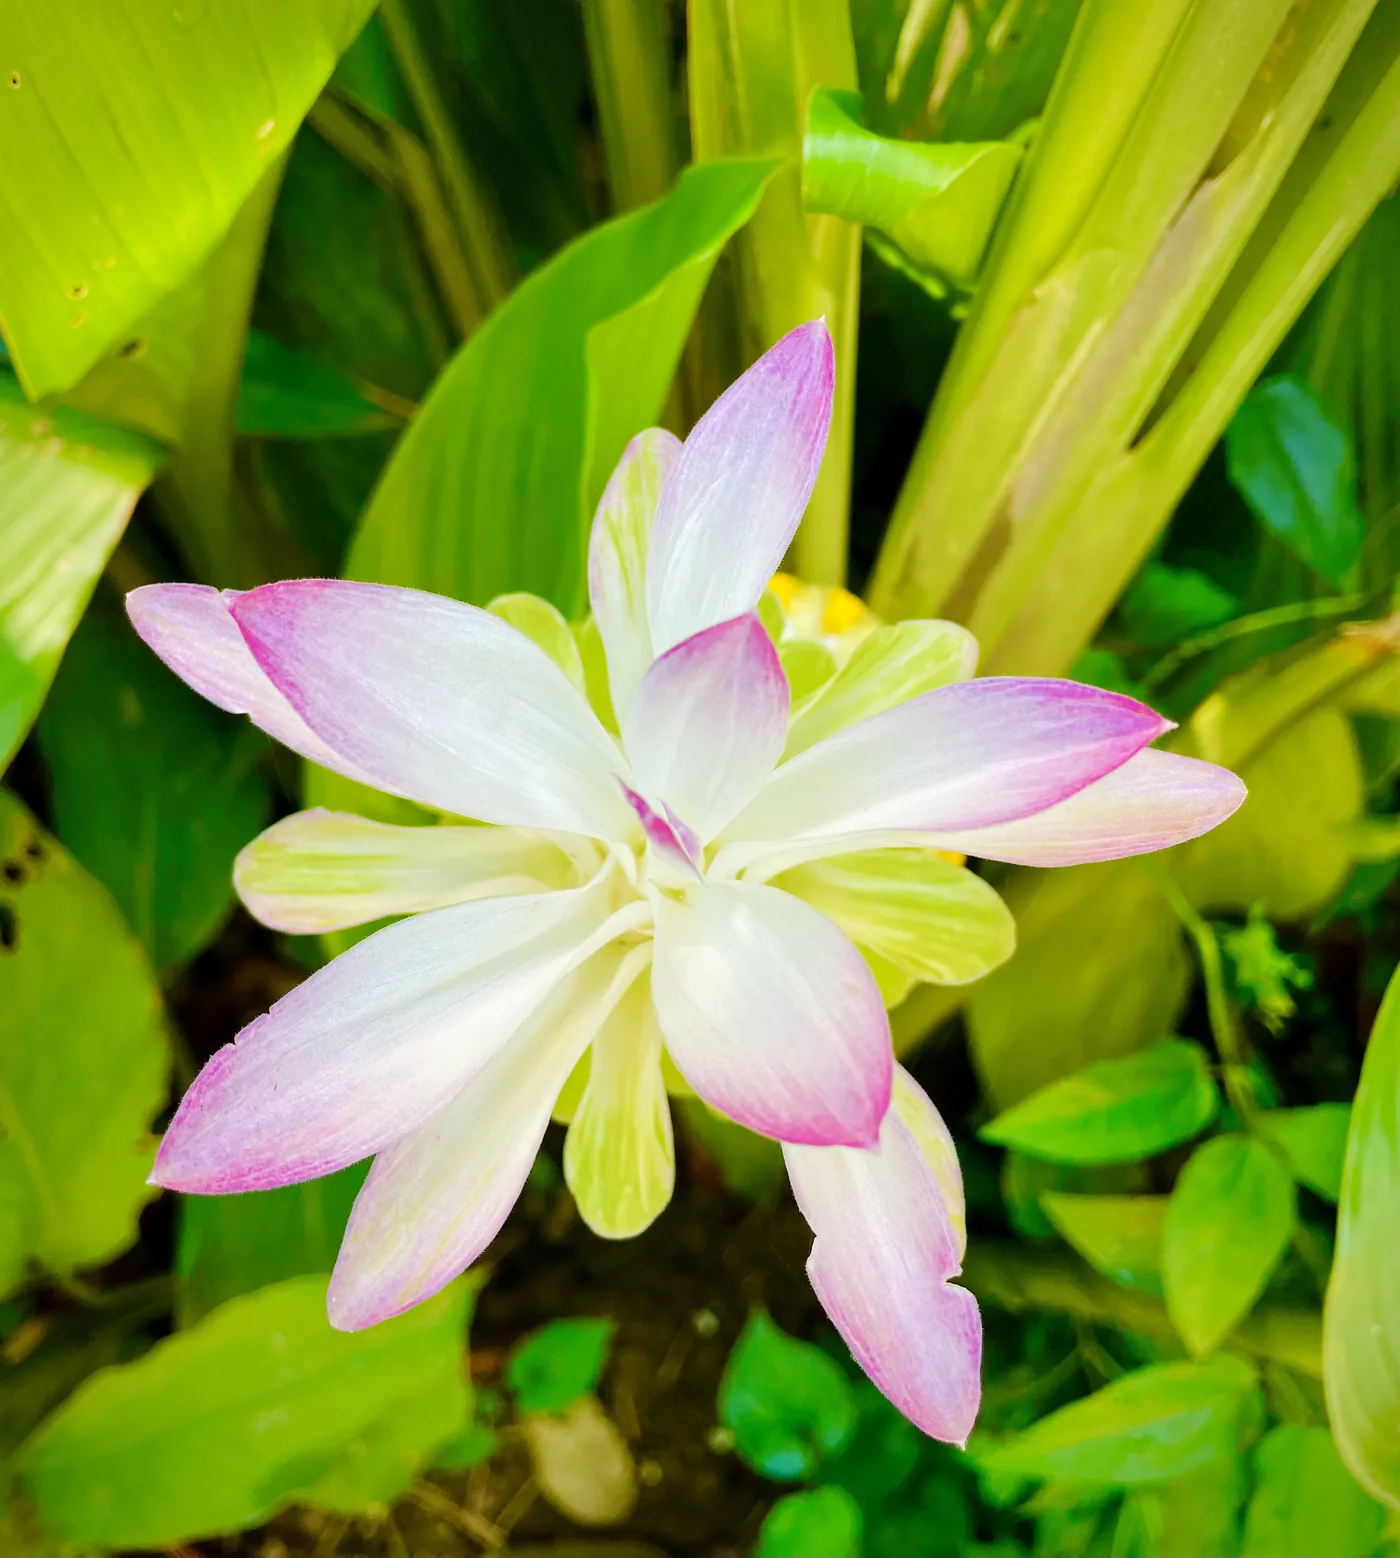
Most cultivated turmeric is sterile and spreads only when the rhizome is divided. Every piece you have ever eaten is a clone of the original domesticated plant, which is why a planting piece from the store behaves like the plant it came from.
A short history of use
Turmeric was a dye before it was a medicine. Austronesian peoples carried it with them from about 3000 BCE, residues turn up at Farmana in northern India in layers dated 2600 to 2200 BCE, and a merchant's tomb at Megiddo in Israel held some from the second millennium BCE. Assyrian medical tablets from the library at Nineveh, in the seventh century BCE, list it as a dye plant. Medieval Europe called it Indian saffron.
In Asia the same root moved into medicine. It is part of Ayurveda, Siddha, traditional Chinese medicine and Unani medicine. In 2019 the European Medicines Agency found the clinical evidence for efficacy insufficient, and accepted its traditional use for mild digestive complaints.
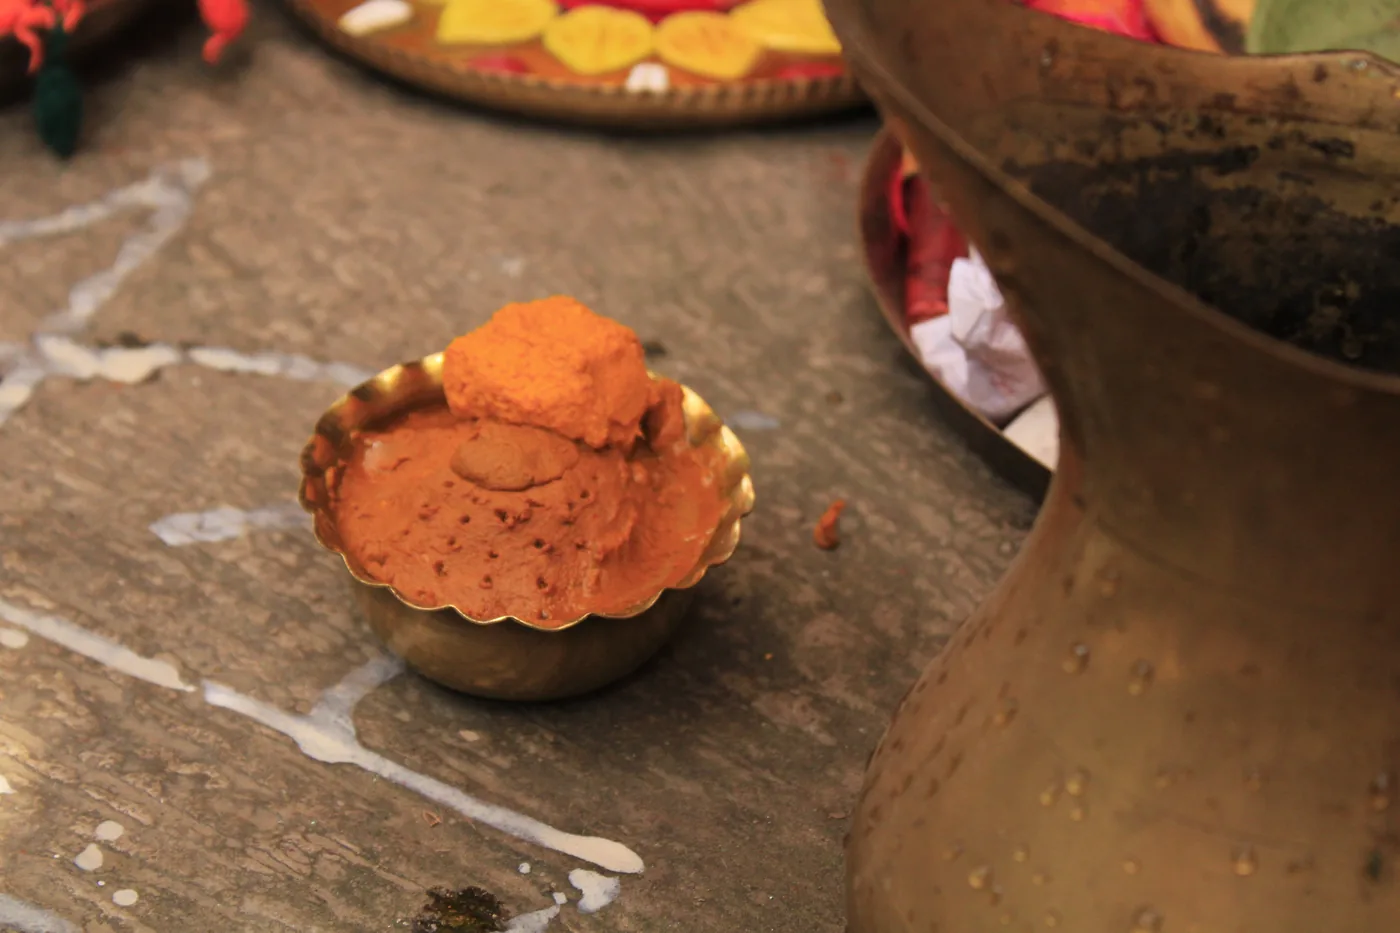
The ritual use never stopped. Turmeric paste is still applied to a bride and groom before a Hindu wedding, in the haldi ceremony, as a blessing and a skin treatment. India grows roughly 80 percent of the world crop, over a million tonnes a year, and the city of Erode in Tamil Nadu earned the name Yellow City as its trading center.
Growing Turmeric
Ideal growing conditions
Turmeric wants what a monsoon forest floor gives it: warmth, shade from the afternoon sun, loose rich soil and steady moisture. Keep those four right and the plant forgives almost everything else, and the targets are easy to hit in any kind of garden.
| Requirement | Ideal |
|---|---|
| USDA hardiness zones | 8 to 11 outdoors; any zone in a pot or greenhouse |
| Temperature | 20 to 30 °C (68 to 86 °F), nothing below 10 °C (50 °F) |
| Light | Partial to full shade; morning sun is fine |
| Water | Evenly moist, never soggy |
| Soil | Loose, compost-rich, well-drained |
| Soil pH | 5.5 to 7.5 |
| Plant spacing | 15 inches apart, rows 15 inches apart |
| Planting depth | 2 to 3 inches, buds up |
| Growing season | 8 to 10 frost-free months |
| Frost tolerance | None; the leaves die at the first frost |
Depth is the number to get right. Two to three inches below the surface, bud pointing up, is deep enough to anchor the piece and shallow enough to sprout fast. Temperature decides the rest of the season, so it comes next.
Ideal growing temperature
The temperature that matters most is the one the soil holds. Below 10 °C (50 °F) turmeric stops growing and the rhizomes are damaged if the cold lasts. Sprouting starts once the soil passes 20 °C (68 °F). Growth is best between 68 and 30 °C (86 °F), and that is the range to aim for in a greenhouse or on a heat mat.
| What it means | Temperature |
|---|---|
| Rhizomes are damaged below | 10 °C (50 °F) |
| Sprouting starts above | 20 °C (68 °F) |
| Top of the ideal range | 30 °C (86 °F) |
Wait until nights stay above 10 °C (50 °F) and the soil passes 20 °C (68 °F) before the plants go outdoors, and bring pots inside before the first frost in fall. That 8 to 10 month season is the real limit in most of the country, which is why the choice of growing method matters.
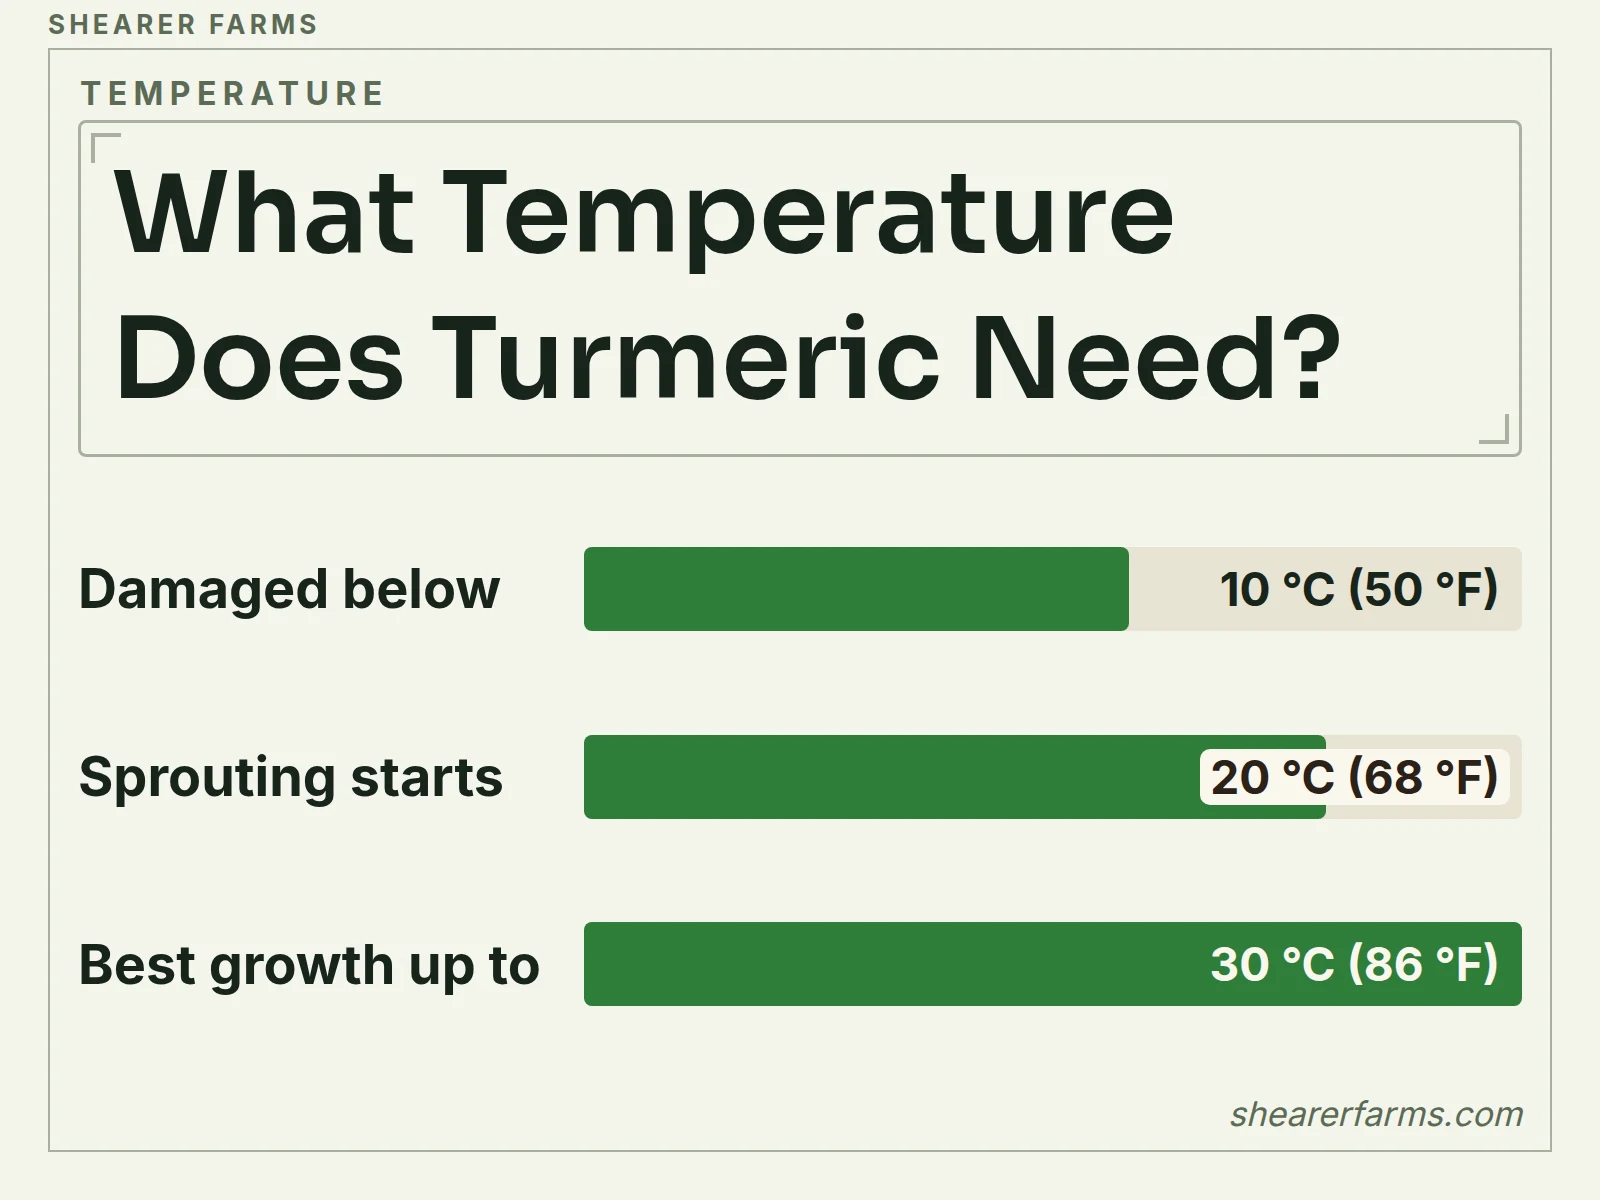
Temperature sets the rhythm of the whole season. Everything that follows, from the choice of method to the day you harvest, is a way of keeping the plant inside that warm band for as long as your climate allows.
Choose your growing method
Six methods work, and the right one depends on your winter. Each gets its own section below, with the details that make it work.
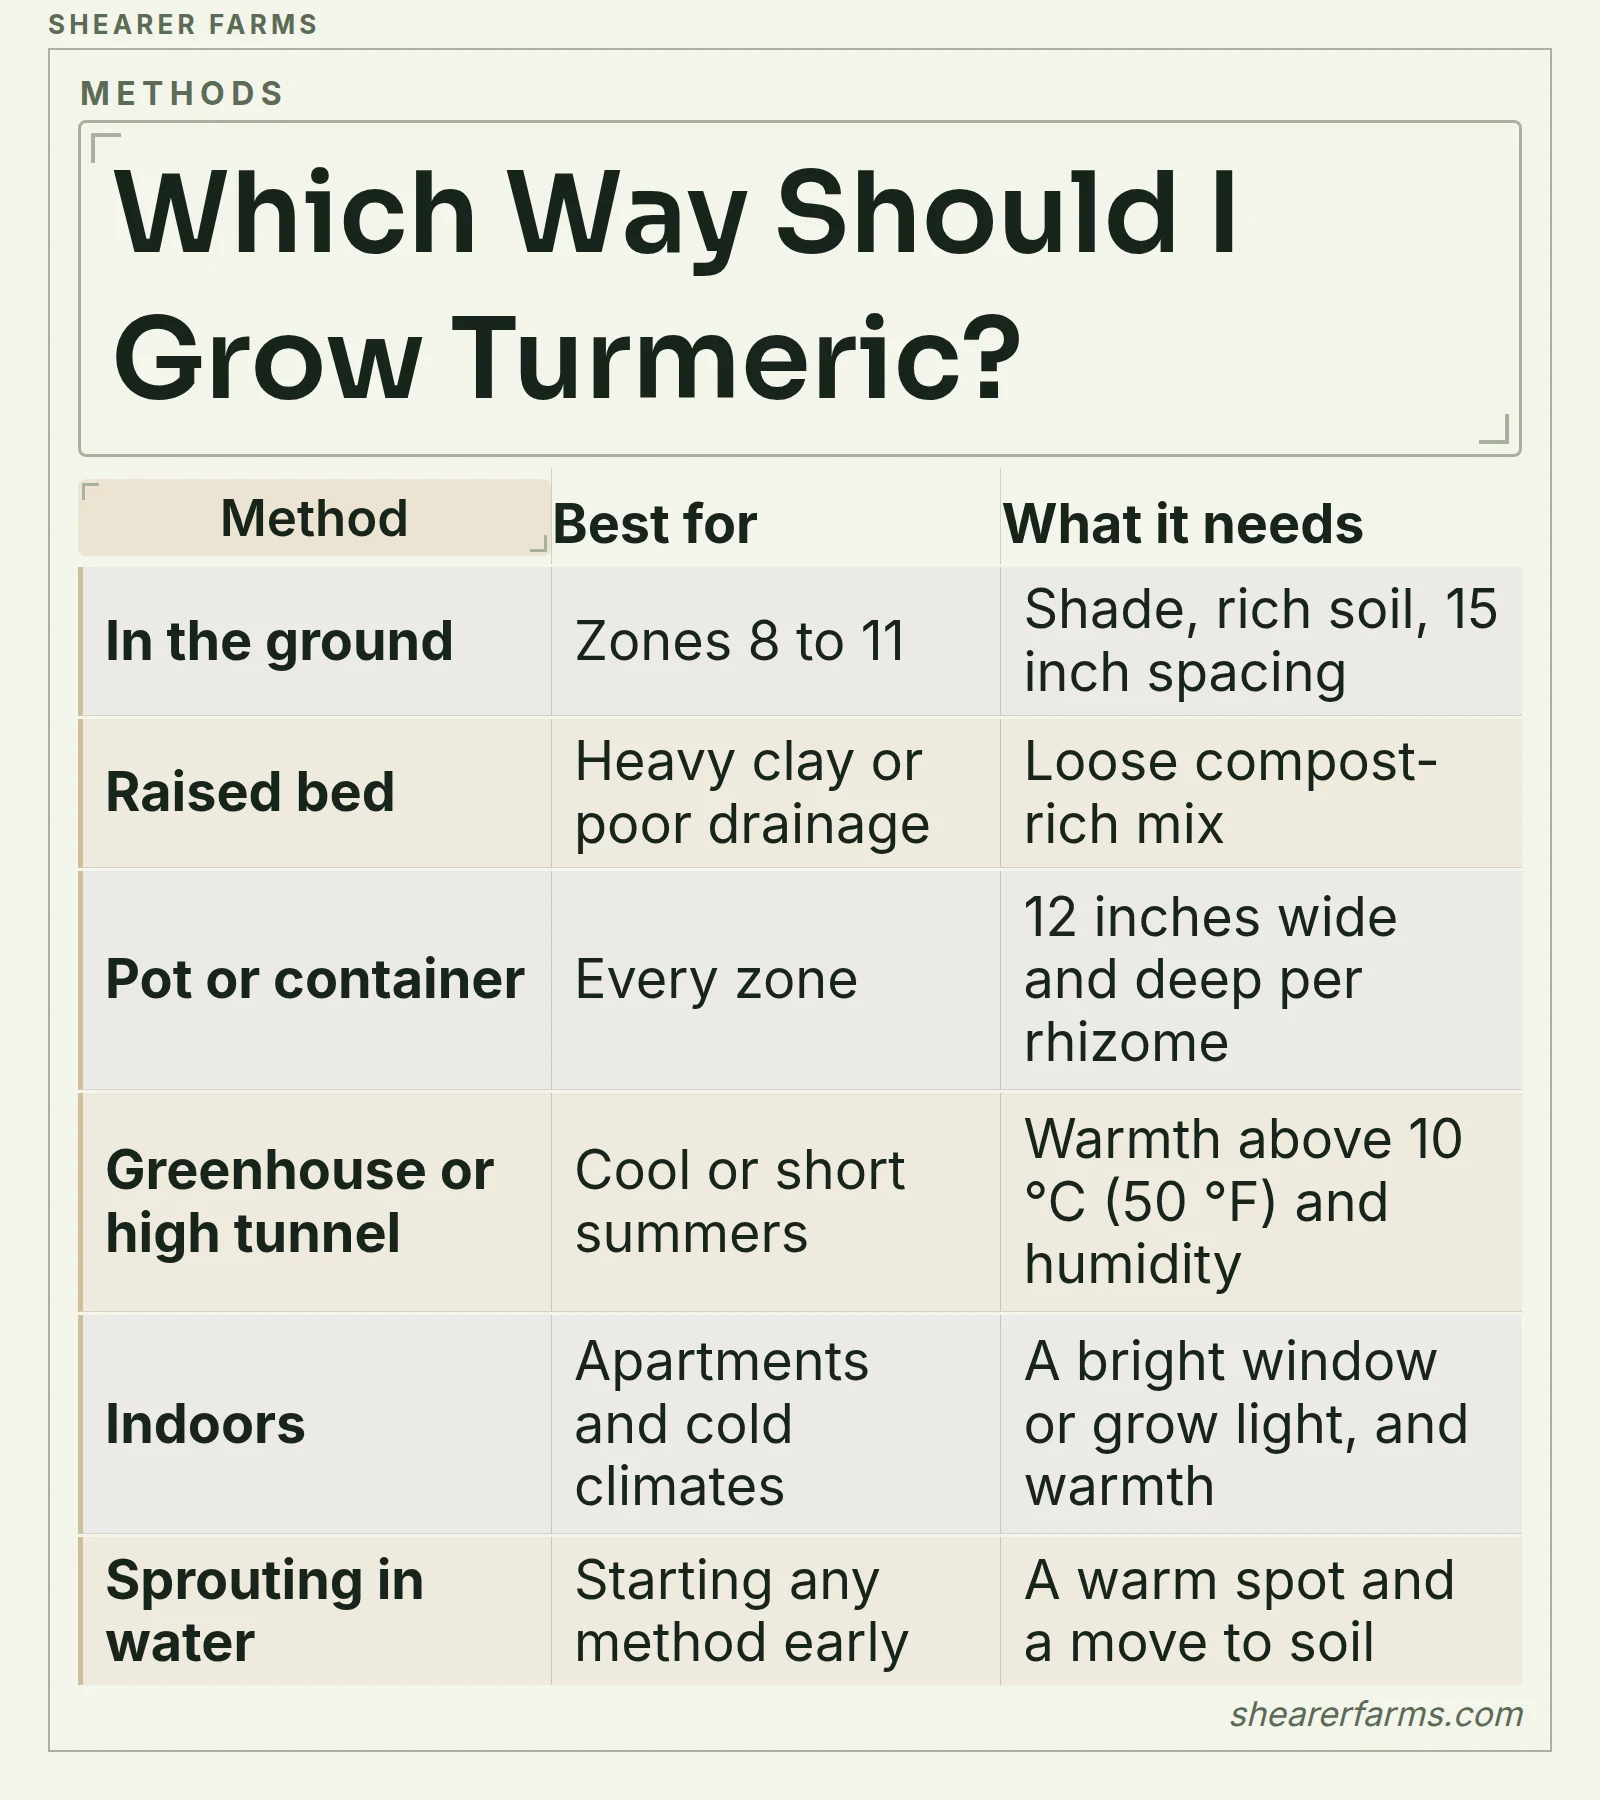
If your winters freeze, the pot and the greenhouse are the two safest choices, because both let you move the plant out of the cold. If you live in zones 8 to 11, the ground and raised beds are easiest and give the biggest harvest per plant.
Growing in the ground
In zones 8 to 11 turmeric behaves like a perennial. It dies back in the winter freeze and comes up again in late spring. Plant firm pieces one to one and a half inches long with at least one bud, set them two to three inches deep in early spring, and space them 15 inches apart in rows 15 inches apart. Cut the pieces a few days ahead so the cut faces dry, which cuts down on rot.
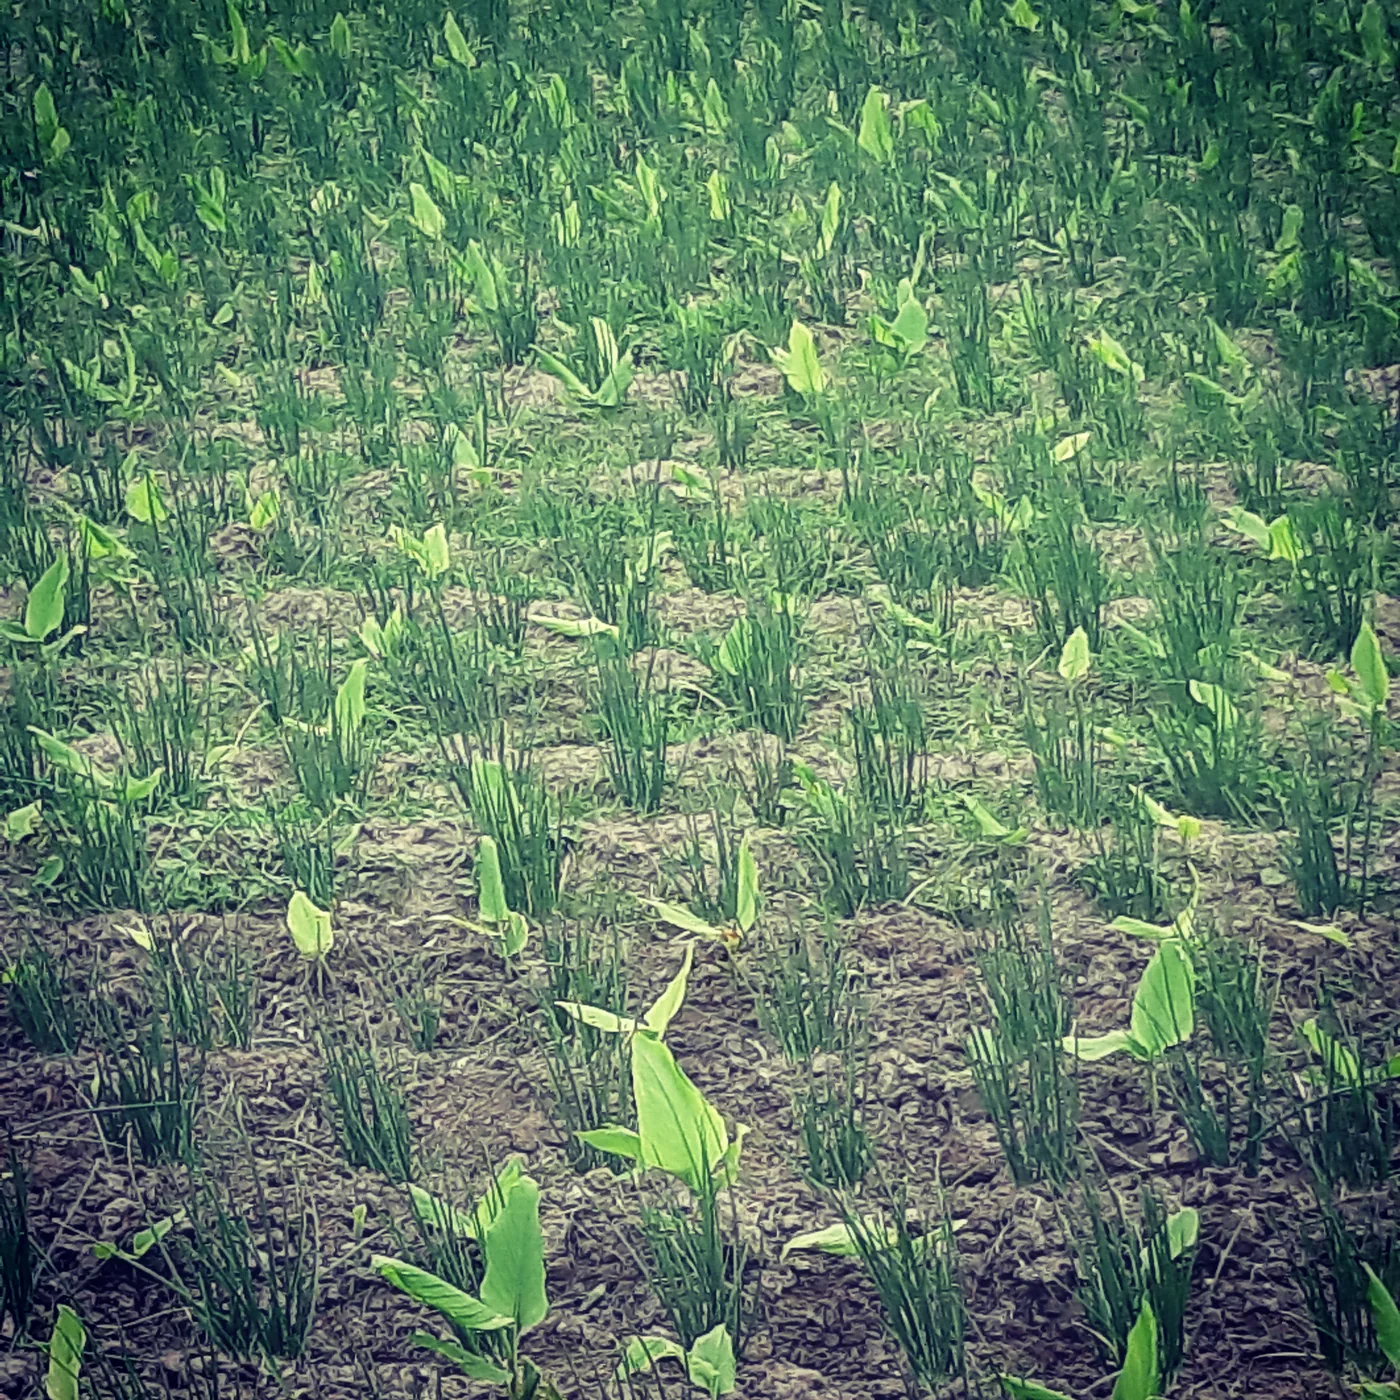
Choose a spot with morning sun and afternoon shade, and mulch heavily to hold moisture and keep weeds down. Farms in Meghalaya, India, weed their turmeric by hand through the season, and a mulch does the same job in a home bed. The clump will fill its space by midsummer, and the leaves tell you when to stop watering: yellowing in fall means the root is ready.
Growing in raised beds
A raised bed fixes the two problems that kill turmeric in the ground: heavy soil that stays wet and a cold start. The soil warms sooner in spring and drains faster after rain, and you control the mix. We recommend loose, compost-rich soil at least eight inches deep, because the rhizomes swell sideways and downward and need room that does not fight them.
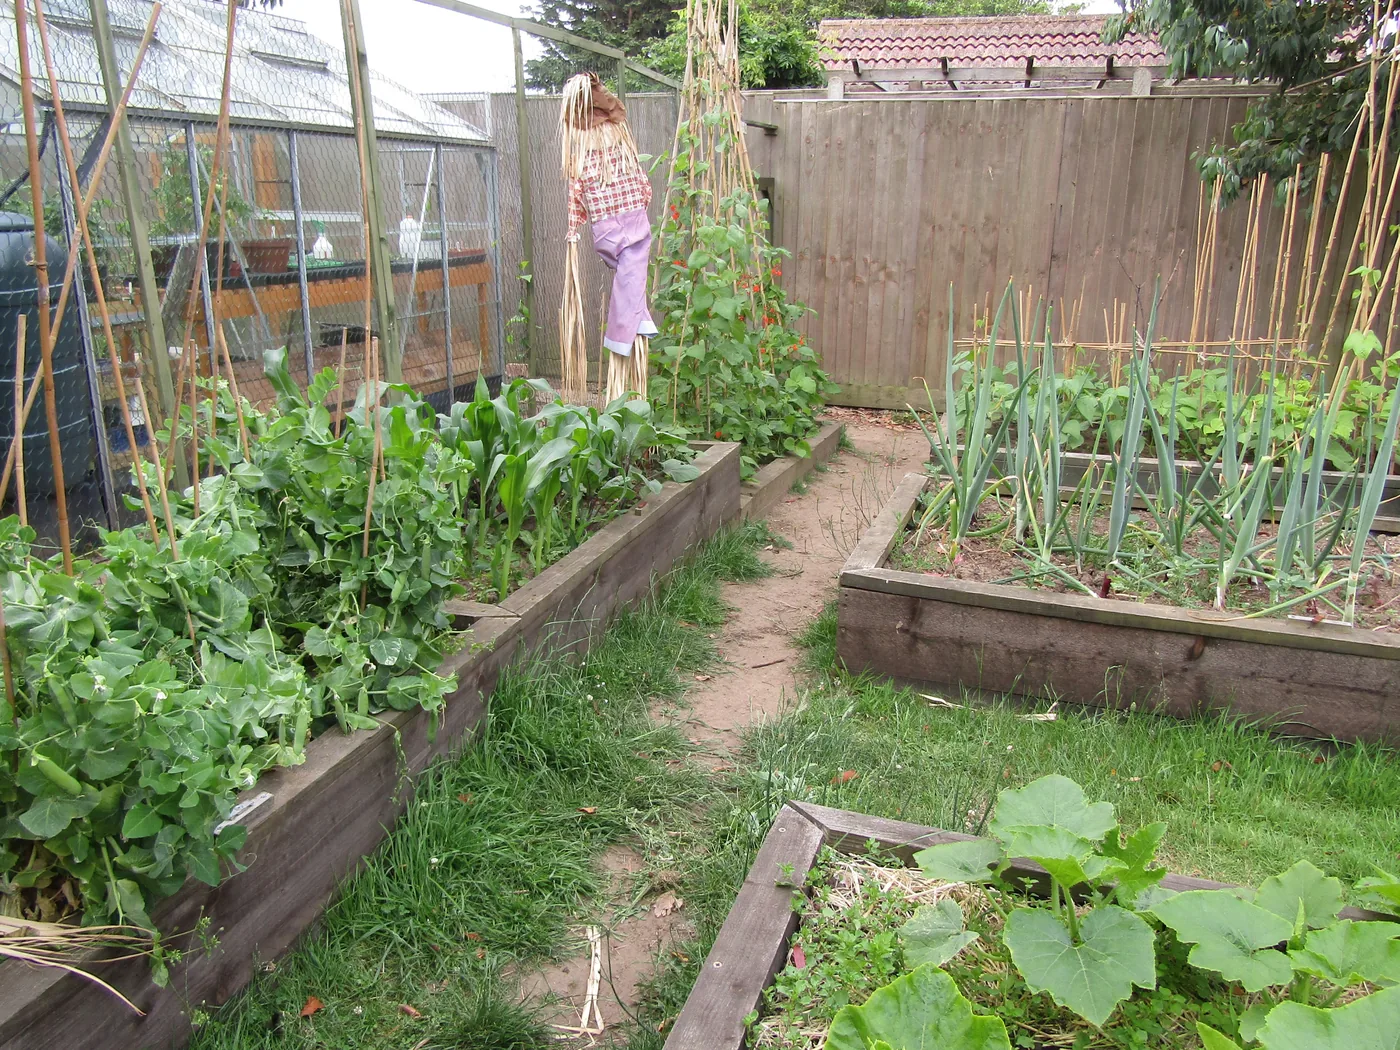
Plant at the same 15 inch spacing and the same depth as in the ground. A raised bed also makes the harvest easier, since you can lift the whole clump with a garden fork without compacting the neighboring plants. Mulch the surface, because a bed dries out faster than the ground and turmeric hates a dry spell.
Growing in pots and containers
A pot is the most reliable way to grow turmeric outside the tropics, because it moves. Use a container at least 12 inches wide and 12 inches deep for each rhizome, with drainage holes and a loose potting mix. The largest pots produce the heaviest rhizomes, so bigger is better when you have the room.
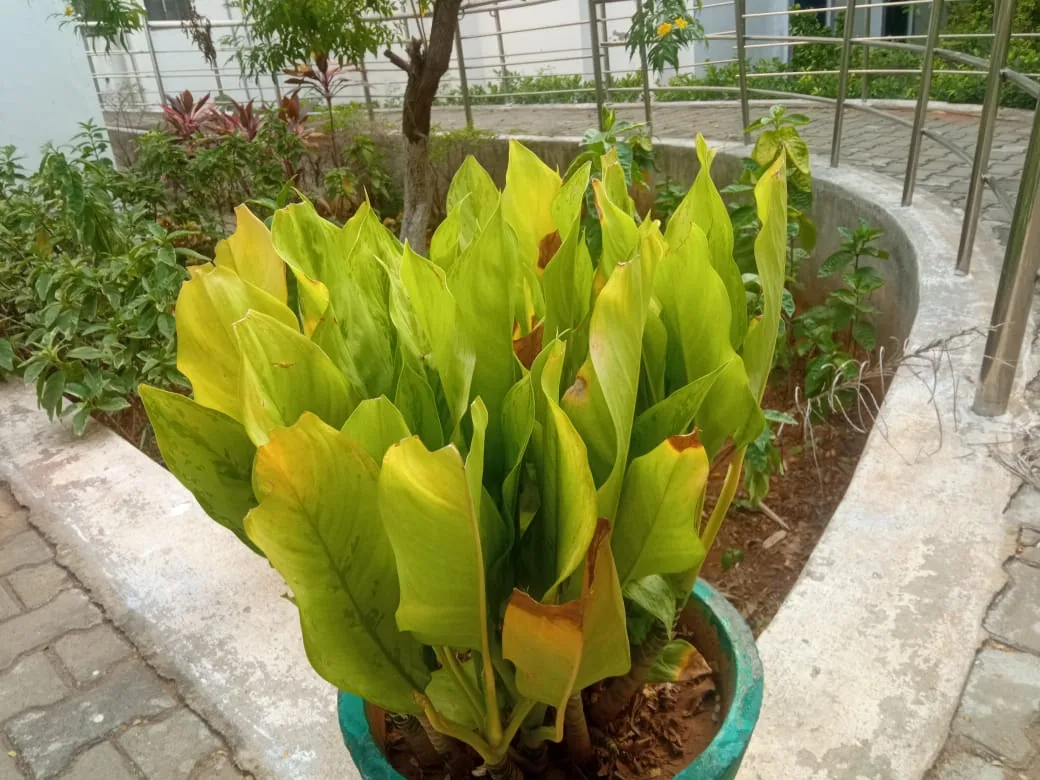
Water when the top inch feels dry and feed monthly with compost or a balanced organic fertilizer. Turmeric is a heavy feeder, and a pot holds limited nutrients. Set the pot where it gets afternoon shade in summer, then carry it into a frost-free room before the first frost in fall and let it dry out as the leaves die back.
Growing in a greenhouse or high tunnel
A greenhouse or polytunnel turns a cool or short summer into a tropical one. It holds heat through cold nights, it holds humidity, and it lets you start rhizomes weeks earlier than you could outdoors. Keep the air above 10 °C (50 °F) at night, shade the plants from hot afternoon sun, and ventilate on bright days so the temperature stays under the top of the ideal range.
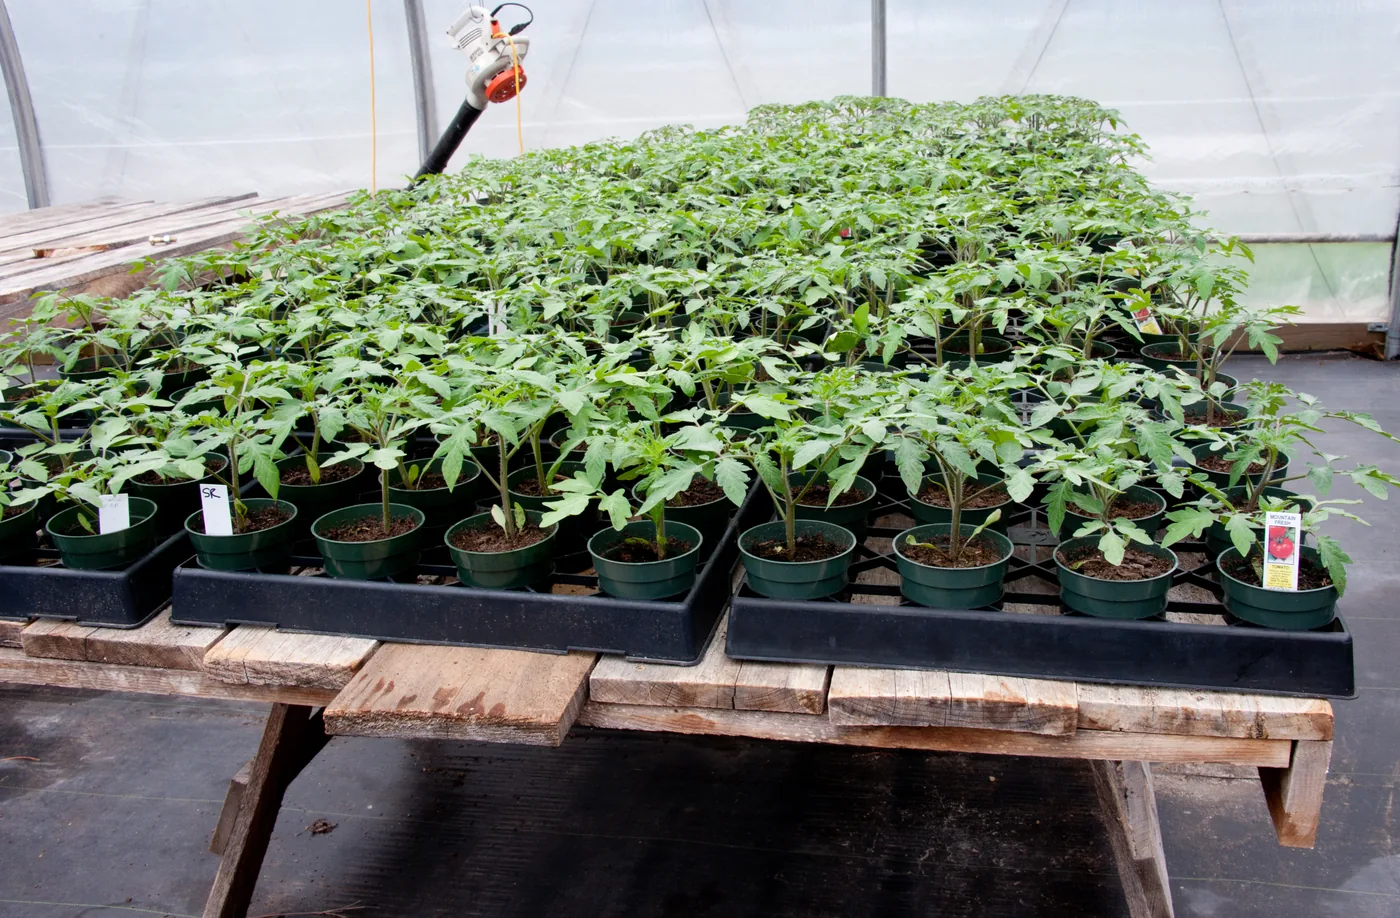
Grow turmeric in pots or deep beds inside the structure, set about 15 inches apart. The warm, humid air that suits tomatoes and eggplant suits turmeric even better, and the extra months of warmth are what let a short-summer garden reach the full 8 to 10 month season.
Growing indoors and sprouting in water
Indoors, a container on a bright windowsill or under a grow light works, with the same 12 inch pot and the same warm temperatures. It gives the plant leaves and a modest harvest, and it keeps a cutting alive through winter. A heat mat under the pot helps when the room runs cool.
Sprouting in water or on damp paper towels is a way to start, not a way to grow. Lay plump pieces in a warm place until shoots appear, then move them into soil. The pieces will push roots in water, but the rhizomes only swell and store curcumin in soil, so treat water as a nursery and plan on potting up.
Starting from a store-bought rhizome
Buy plump, firm rhizomes with visible buds, called eyes, from a farmers market or an organic grocer, and avoid shriveled pieces. Cut them into sections one to one and a half inches long, each with a bud, and let the cuts dry for a few days before planting. Start them indoors in late winter, about 4 to 8 weeks before your last frost, and set them out once the nights stay above 10 °C (50 °F) and the soil is warm.
Soil, feeding and water
Turmeric is a heavy feeder and a pot or bed runs low on nutrients fast. Work compost into the bed before planting, then side-dress with compost or a balanced organic fertilizer every month through summer.
Water evenly. The roots rot in standing water and the leaves scorch in dry soil, so aim for moist like a wrung-out sponge. Drip irrigation fits the plant best because it waters the soil and keeps the leaves dry.
Your first season, step by step
Everything above, in the order you will do it. A beginner can follow this list from a store-bought rhizome to a dried, ground spice.
- Late winter: wake the rhizome. Lay plump pieces, each with a bud, on damp paper towels somewhere warm until shoots appear, then pot them up.
- Once the soil stays above 20 °C (68 °F): plant. Set pieces one to one and a half inches long, bud up, two to three inches deep and 15 inches apart.
- Through summer: water and feed. Keep the soil evenly moist and side-dress with compost each month.
- When the leaves yellow: stop watering. The plant is moving its energy into the root, so wait until the foliage is brown and dry.
- Around 8 to 10 months: harvest. Brush off the soil without washing, keep the biggest pieces to replant, and cure the rest before drying or grinding.
Those five steps cover the basics.
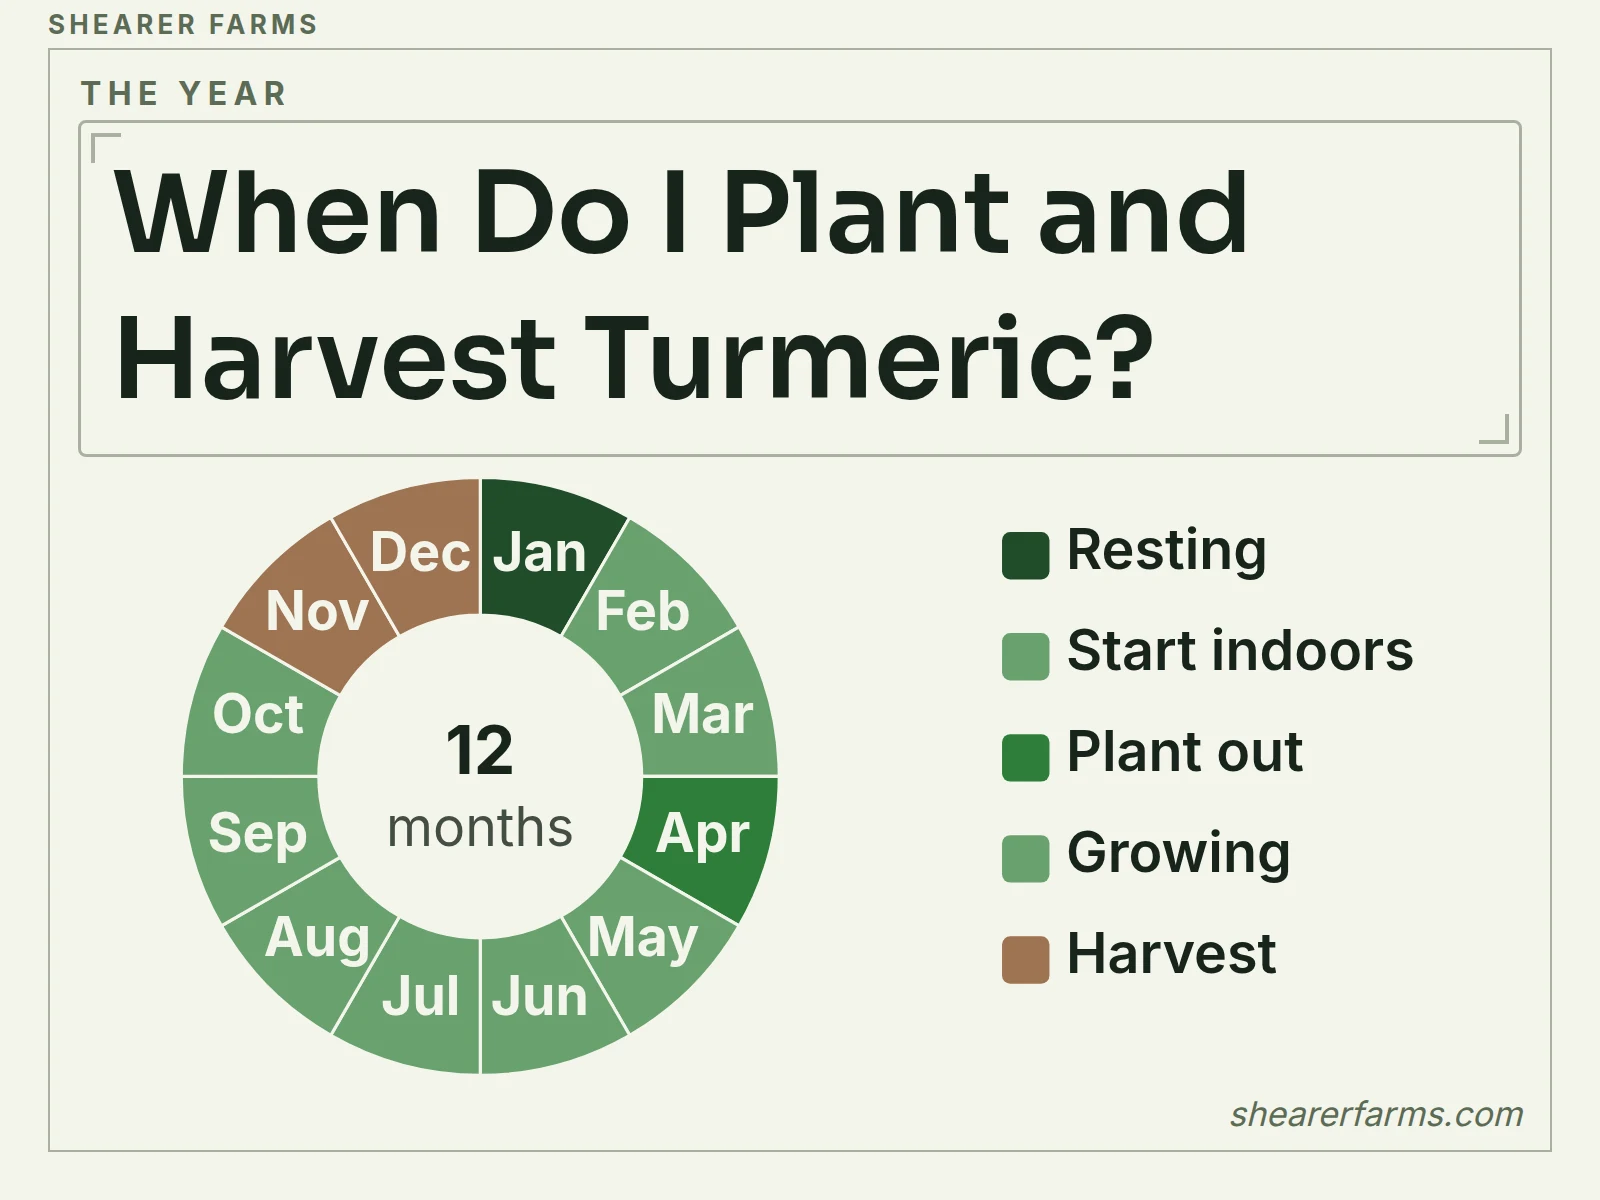
In zones 8 and 9 that means starting indoors in late winter, planting out when the soil warms, growing through the summer and harvesting in late fall. Colder zones shift every step later, and a pot or greenhouse lets you start earlier. Next, what can go wrong along the way.
When something goes wrong
Yellow leaves in late fall are not a problem. They are the dormancy signal that the root is ready. Yellow leaves in midsummer point to overwatering, cold nights or hungry soil, so check drainage first and feed second.
No shoots after four weeks means the soil is too cold, since sprouting needs soil above 20 °C (68 °F), or the piece has rotted from sitting wet. Lift one and check: a firm piece needs more heat, and a soft, sour-smelling one is lost and should be replaced with a fresh piece in drier soil.
Growing turmeric in Texas
Texas is turmeric country if you work with the calendar. Gardeners across the state start rhizomes indoors in late winter and move them out after the last frost, when the soil passes 20 °C (68 °F). The long warm season matches the 8 to 10 months the root needs.
Texas Hill Country Strategy
Start rhizomes indoors 4 to 8 weeks before the last frost, transplant to a sheltered east-facing bed with afternoon shade once nights stay above 10 °C (50 °F), and mulch heavily to hold moisture. Harvest before the first fall cold snap. A pot that moves indoors for winter is the most reliable method, and it gives smaller yields than a tropical field, but the freshness of home-grown root makes up for it.
Count back four to eight weeks from your last frost date to time the indoor start, and plant out when your soil, not the calendar, says it is warm enough.
Variants Worth Growing
Turmeric is sold by place name and by released cultivar name more often than by botanical variety, so a grower choosing a plant is really choosing a cultivar. Three questions decide it: which one gives the most root, which one holds the most curcumin, and which one stands up best to pests and disease. The figures below come from the cultivar list of Tamil Nadu Agricultural University and from a trade summary of Lakadong turmeric. They were measured in different fields and years, so read them as a ranking and not as a promise.
| Question | Variant | Why |
|---|---|---|
| Top Yielding | BSR 3, a Tamil Nadu Agricultural University release | It averaged 51 tonnes of fresh rhizome per hectare, ahead of CO 2 at 43 and Erode local at 30 to 32, and it matures in 240 to 250 days with 4.8 percent curcumin. |
| Highest In curcumin | Lakadong, from the West Jaintia Hills of Meghalaya | A trade summary reports up to 7.5 percent curcumin against an average of about 3 percent for other turmeric, and the university releases listed here top out near 4.8 percent. |
| Hardiest | CO 2, a Tamil Nadu Agricultural University release | It is moderately resistant to leaf blotch and leaf spot, highly resistant to rhizome rot and field tolerant to thrips, shoot borer, leaf folder and scale insect, and it still gave 43 tonnes per hectare with 4.3 percent curcumin. |
| Alleppey Finger | A Kerala type sold as a spice grade | The same trade table lists it near 5 percent curcumin, between Lakadong and the 2 to 4 percent of Erode. |
| Erode local | The old Tamil Nadu market type | It gave 30 to 32 tonnes per hectare with 3.9 percent curcumin, and the university describes it as vigorous and tall with good market acceptability. |
| Salem local | A Tamil Nadu type grown beside Erode | Its yield is comparable with Erode local and its curcumin is higher, 4.75 percent, with a moderate curing percentage. |
None of the cultivars on that list is frost hardy, so the cold advice in the growing section applies to every one of them. If you grow only one, grow the one that fits your goal: BSR 3 for the heaviest root, Lakadong for the most pigment, CO 2 where leaf spot and rot are the worry. Buy seed rhizomes of a named cultivar so you know what you planted.
Black turmeric, Curcuma caesia, is a different species and not a variant of this one. In a comparison of it with Curcuma longa and Curcuma amada by HPTLC, a chemical fingerprinting method, it showed camphor and no curcumin, so it is not a curcumin crop and this guide does not cover how to grow it.
Dragon Fruit Cultivation Guide
Complete guide to dragon fruit cultivation covering Hylocereus and Selenicereus species, climate requirements.
For a More In-Depth Read, Click HereGrowing For Rhizomes and Seed Rhizomes
Turmeric is grown for two different crops, the root (the rhizome that is eaten or extracted) and the seed rhizomes that become next year's plants, and the work that raises one is not quite the work that raises the other. Both start with a plant that is warm, fed and never short of water.
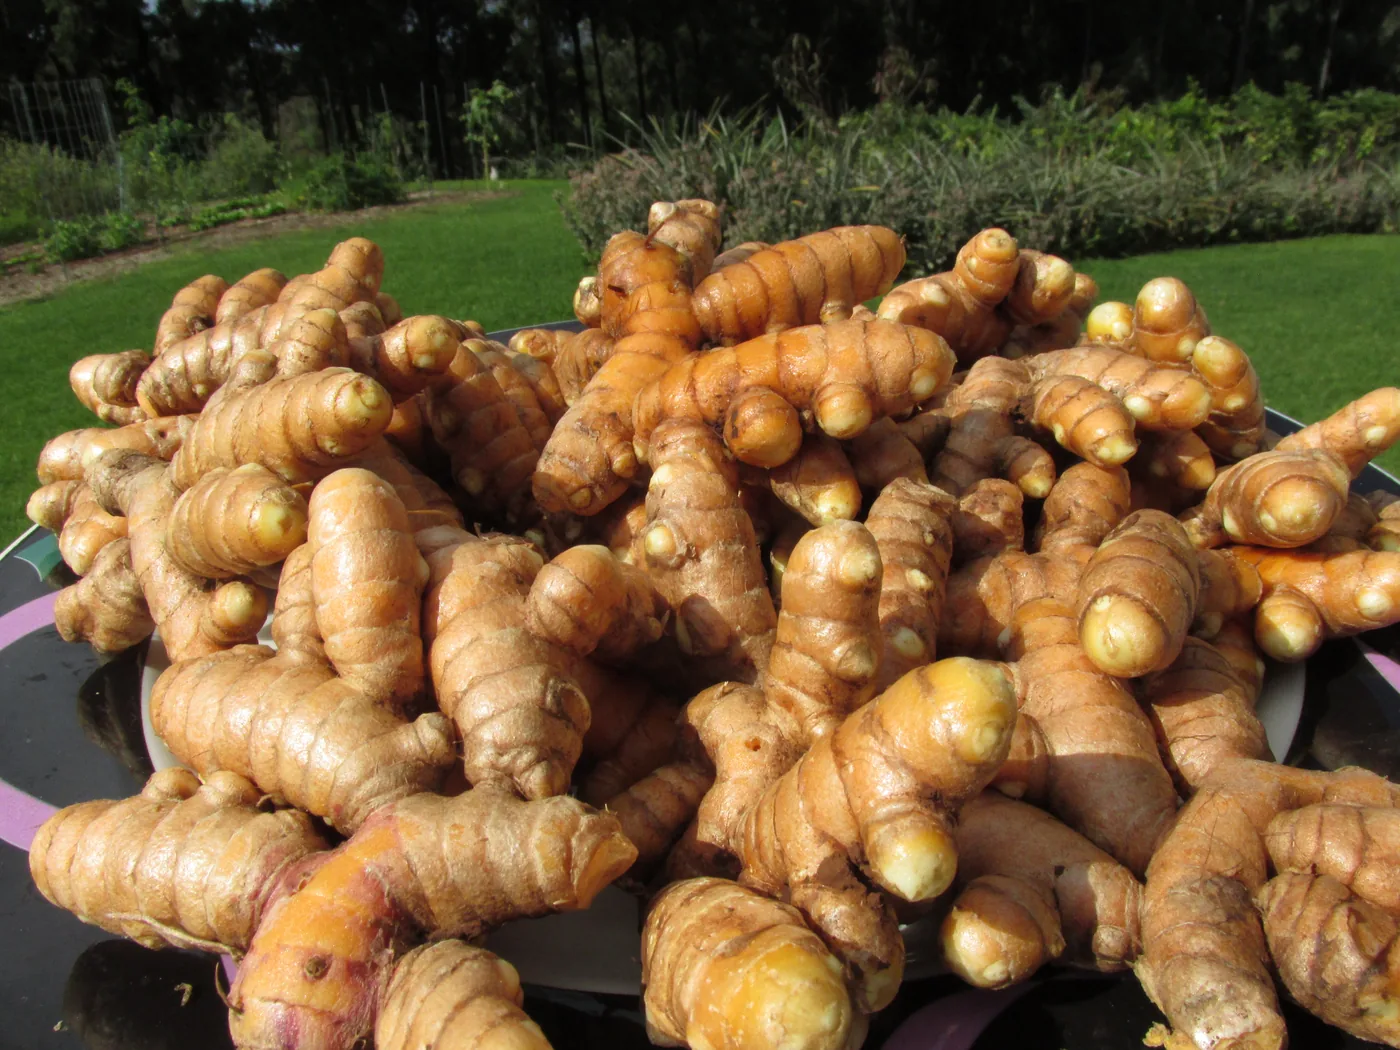
Conditions. The root swells in loose, compost-rich soil with steady moisture and shade from the afternoon sun, so water when the top inch is dry and feed with compost every month through summer, because turmeric is a heavy feeder. Cold soil stops growth, so keep the soil above 68 °F when the pieces sprout.
Spacing. Plant pieces 15 inches apart. A crowded clump has no room for the rhizomes to spread sideways, and the root stays small.
Pruning. There is little to prune. Leaves feed the root, so take only a few for the kitchen and leave the rest until they yellow. Thin any shoots that crowd the clump, and remove dead leaves in fall.
Harvest timing. The root keeps filling until the plant goes dormant, so wait for the leaves to yellow and fall over, usually 8 to 10 months after planting, and harvest before the first frost.
Curcumin content. The biggest gap we found is between cultivars, about 3 percent for ordinary turmeric against up to 7.5 percent reported for Lakadong, so choose the cultivar before you change anything else.
Seed rhizomes. Each piece you plant is a clone of its parent, so keep the plumpest, disease-free mother rhizomes and fingers from the clump whose root you want to repeat, cure the cuts for a few days and replant in spring. In a Lakadong trial at Imphal, pieces of 24 to 26 grams gave the highest yield, while the smallest, 4 to 6 grams, gave the best return for the money spent on seed.
If you want leaves instead of root, harvest the leaves while the plant is growing and expect a smaller root, because every leaf removed is less food for the rhizome. If you grow for the flower, plant a cultivar that blooms in your climate, and know that the flower is the least studied part of the plant.
Harvest, Curing and Storage
When to harvest
Wait for the plant to tell you. When the leaves yellow and fall over, usually in late fall or early winter, the plant is going dormant and the rhizomes are full. That is 8 to 10 months after planting. In places with frost, harvest before the first frost whatever the leaves look like.
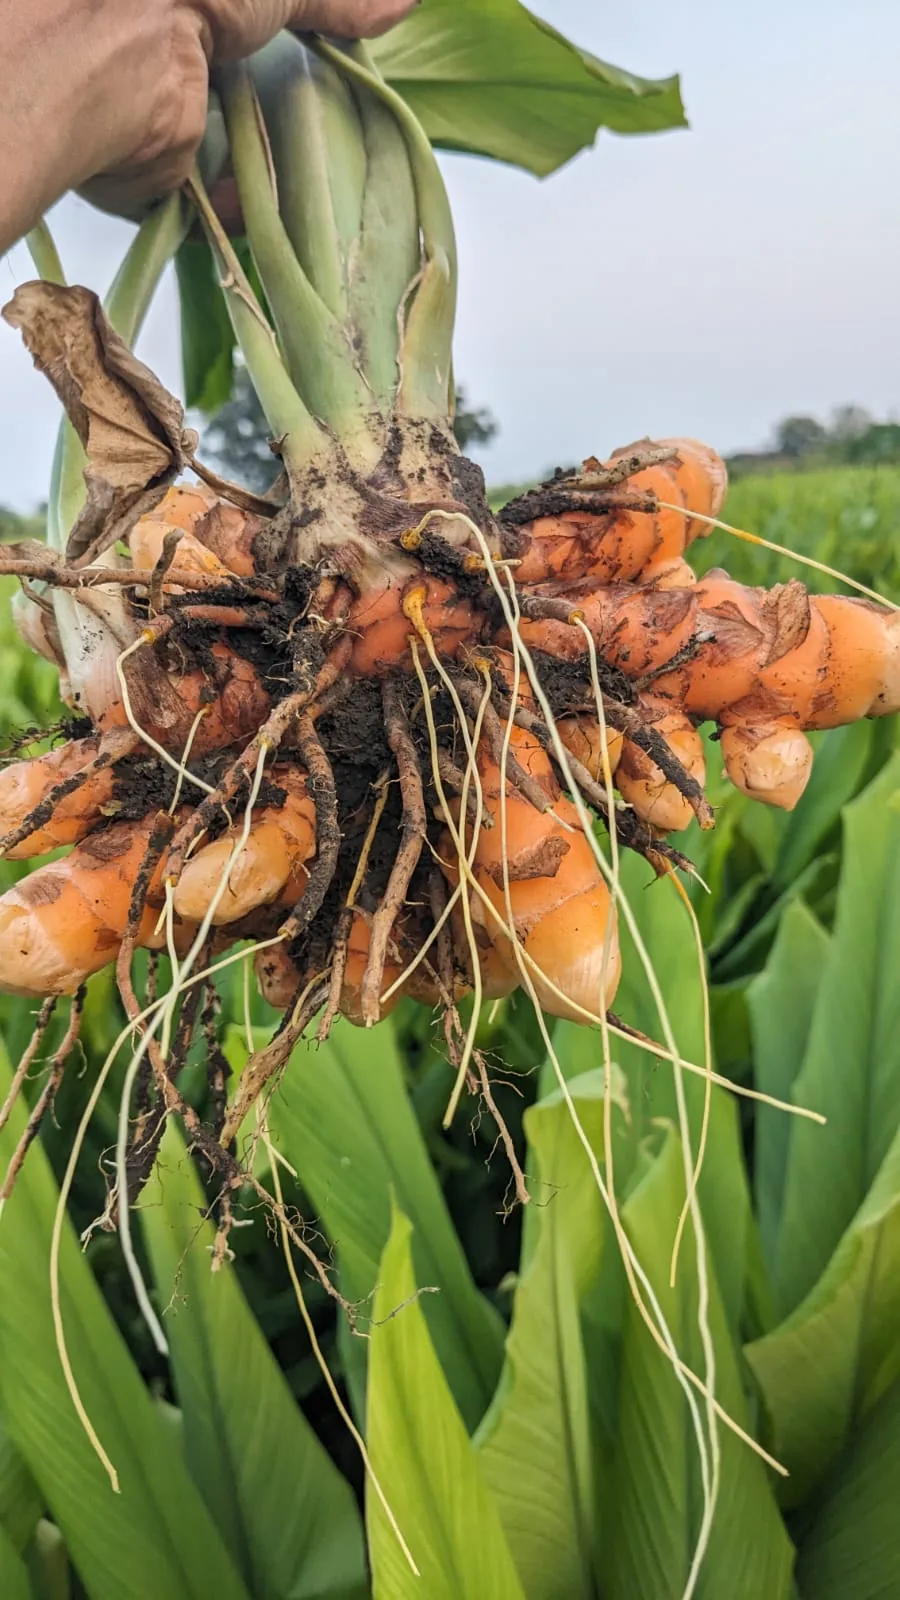
Loosen the soil around the clump with a garden fork and lift the whole mass. Brush the soil off, but do not wash the rhizomes you plan to store, because water speeds up mold on the skin. Separate the large mother rhizomes, which you replant next spring, from the finger rhizomes, which you eat and process.
Curing and drying
Traditional processing boils the fingers in water for 45 to 60 minutes until they soften and smell like turmeric, then dries them in the sun. Boiled rhizomes dry completely in about 11 days, slicing them cuts the drying time to about 9 days, and the dried root weighs roughly 17 to 25 percent of the fresh root. The boil gelatinizes the starch and spreads the color evenly, and overcooking dulls it.
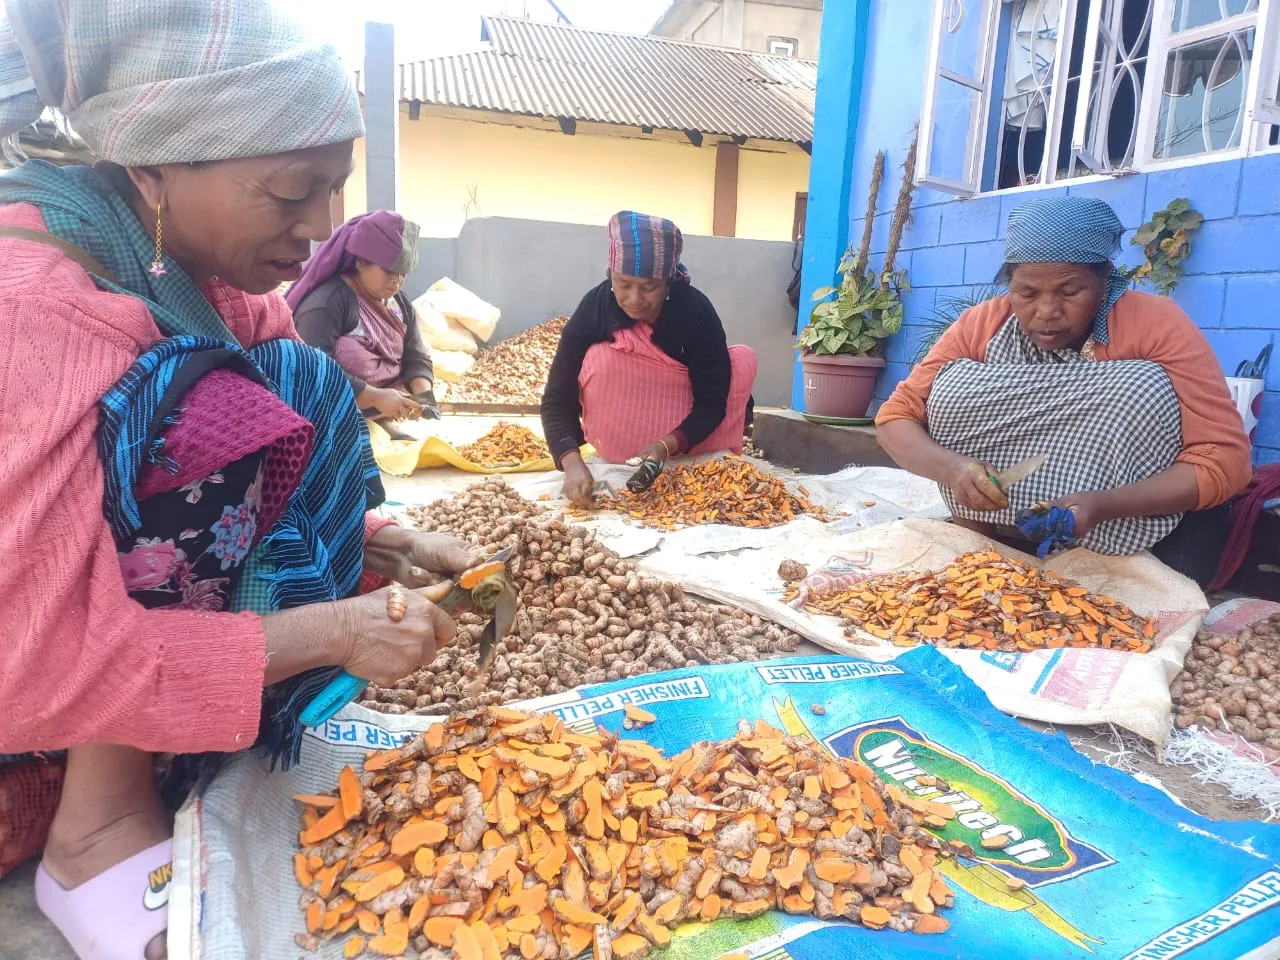
At home you can skip the boil. Slice the fresh fingers thin and dry them in a dehydrator at 57 °C (135 °F) for 6 to 8 hours, which is the schedule we use, or in the sun on screens, then grind the pieces in a spice grinder. Fresh root is also perfectly good to use right away, grated into food or blended into juice.
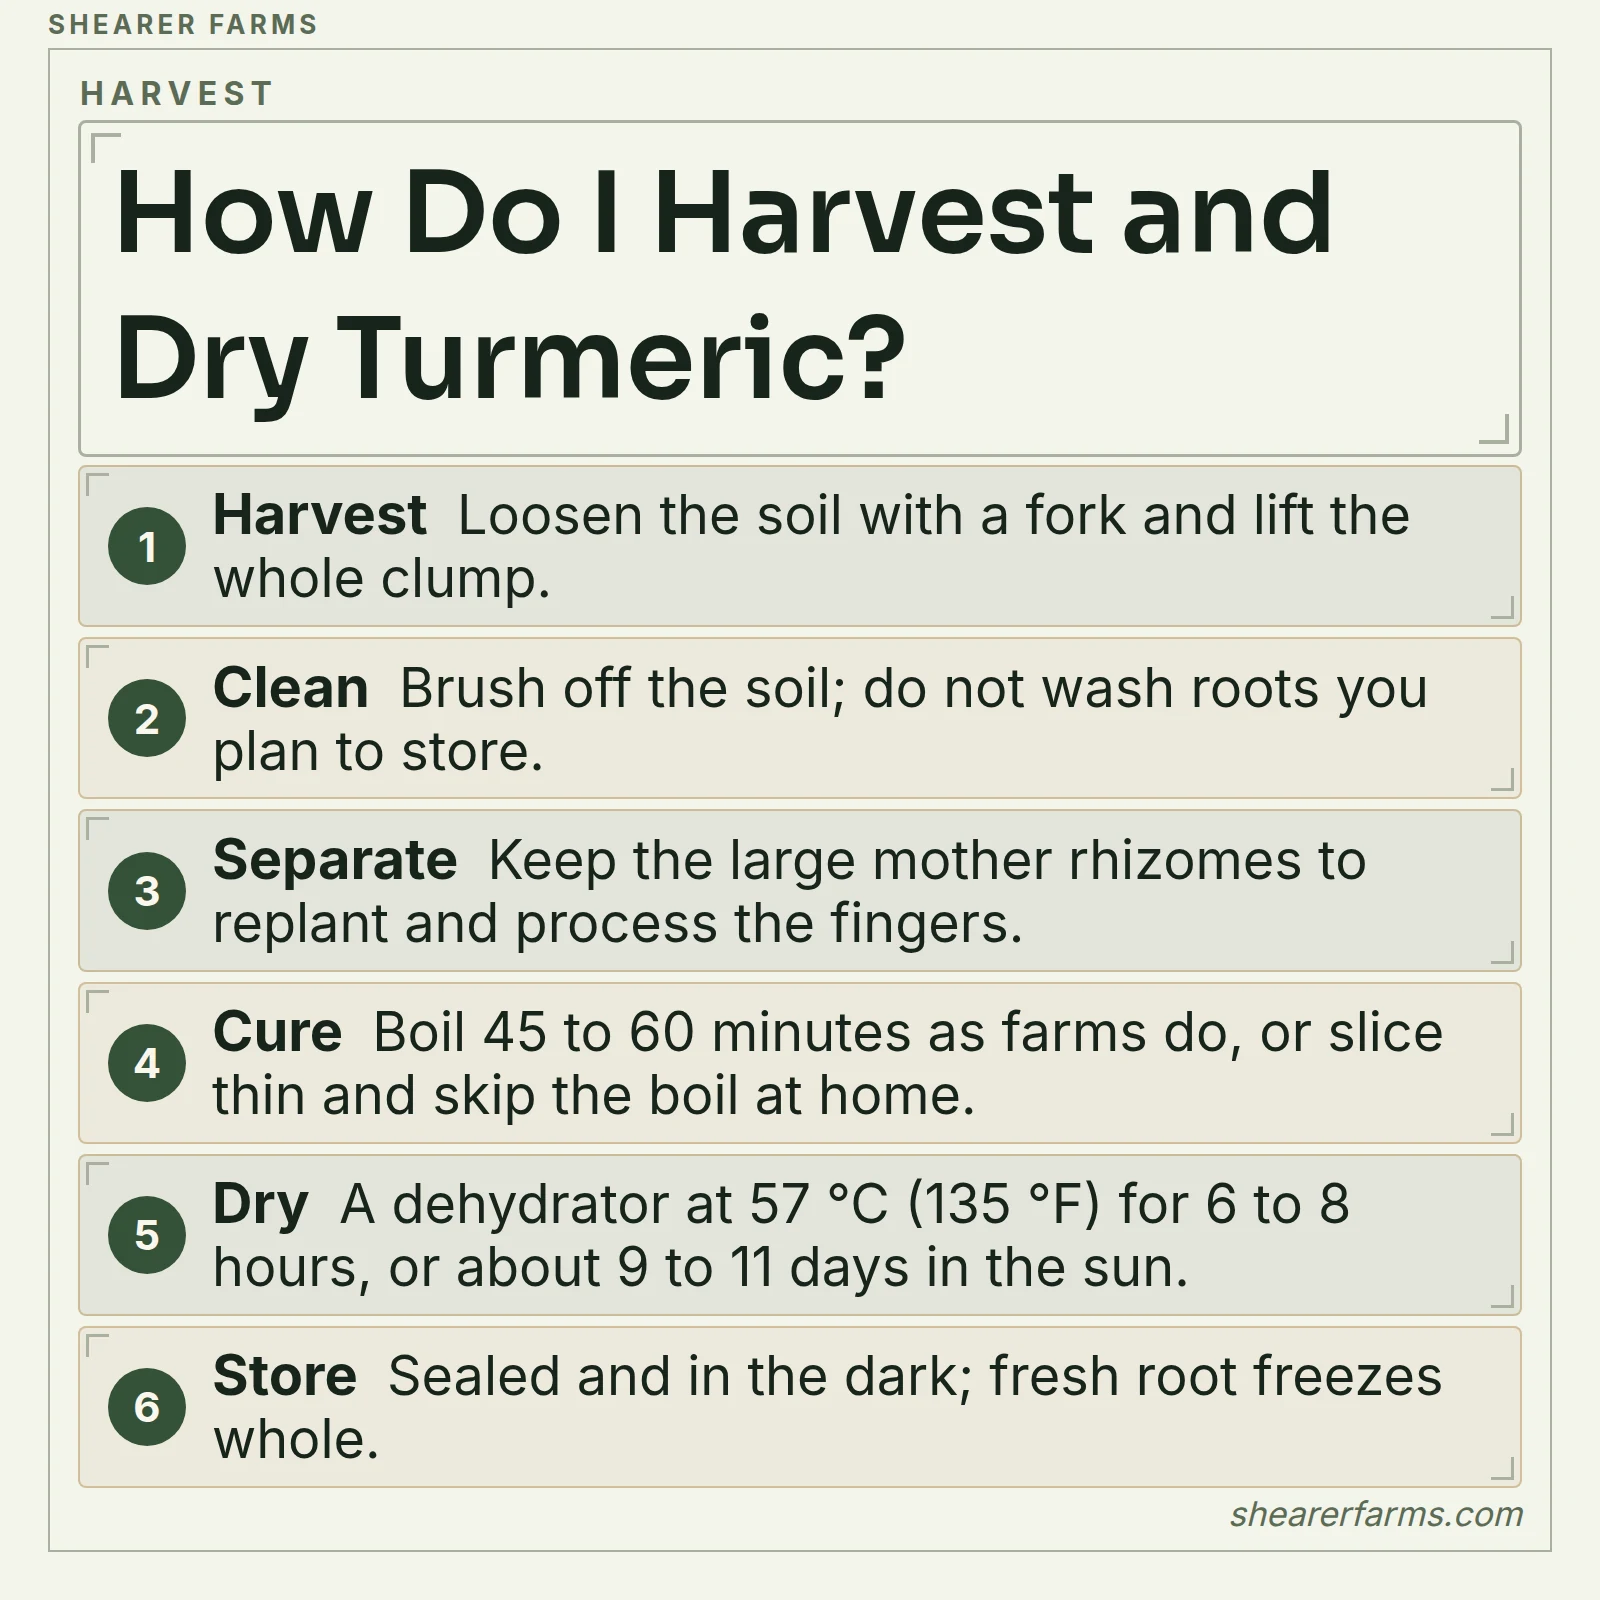
Once the fingers are dry, the root needs only a sealed container and a dark place.
Storing turmeric
Fresh rhizomes last two to three weeks in a paper bag in the refrigerator. For longer storage, wash, peel and freeze the root, then grate it frozen straight into the pan. Pickling works too.
Dried turmeric keeps its color and oils best in an airtight glass jar in a dark cupboard, away from heat and sunlight, because curcumin breaks down in light. Grind in small batches as you need them, since whole dried pieces hold their oils far longer than powder does.
Yield expectations
Commercial fields in India average about 20 to 22 tonnes of fresh rhizome per hectare, which is about 8 to 9 tonnes per acre. A planted piece multiplies into a mother rhizome with a set of fingers. Pot and backyard yields run far below field yields, so plan on a few good harvests of fresh root rather than a pantry of powder from one plant.
Eating Turmeric: Nutrition and Why It Is Good for You
A teaspoon of turmeric
The ground spice is more nutritious than its tiny serving suggests. The USDA lists 100 grams of ground turmeric at 312 calories, 22.7 grams of fiber, 55 milligrams of iron, 19.8 milligrams of manganese and 2,080 milligrams of potassium. Nobody eats 100 grams, so we scale those figures to a teaspoon of 2.2 grams, a normal amount for a pot of curry.
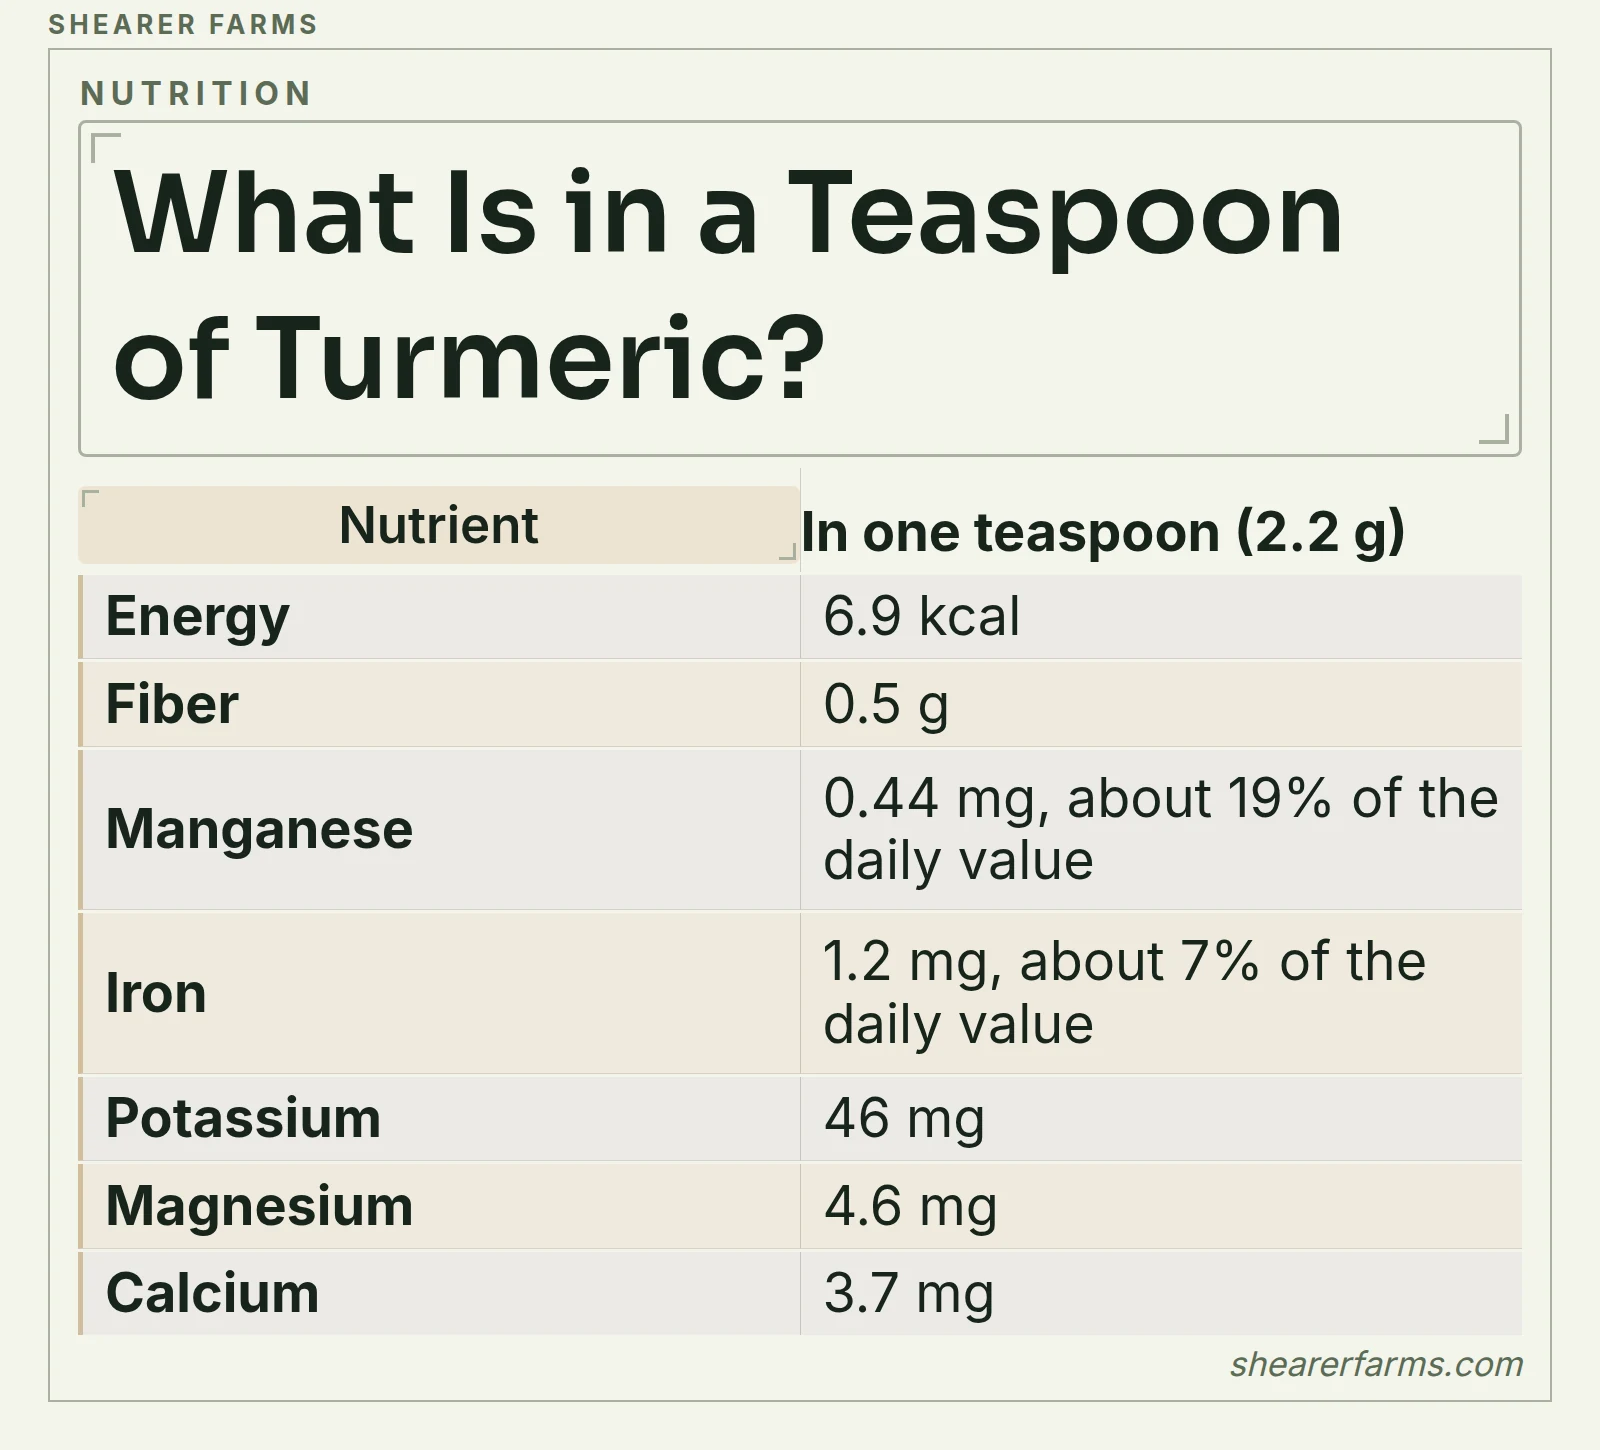
Manganese is the standout. It supports bone formation and the enzymes that protect cells from oxidative damage, and one teaspoon covers about a fifth of a day. The iron is the plant kind, which the body absorbs less well than iron from meat, so treat turmeric as a contributor to your iron intake and not as the main source.
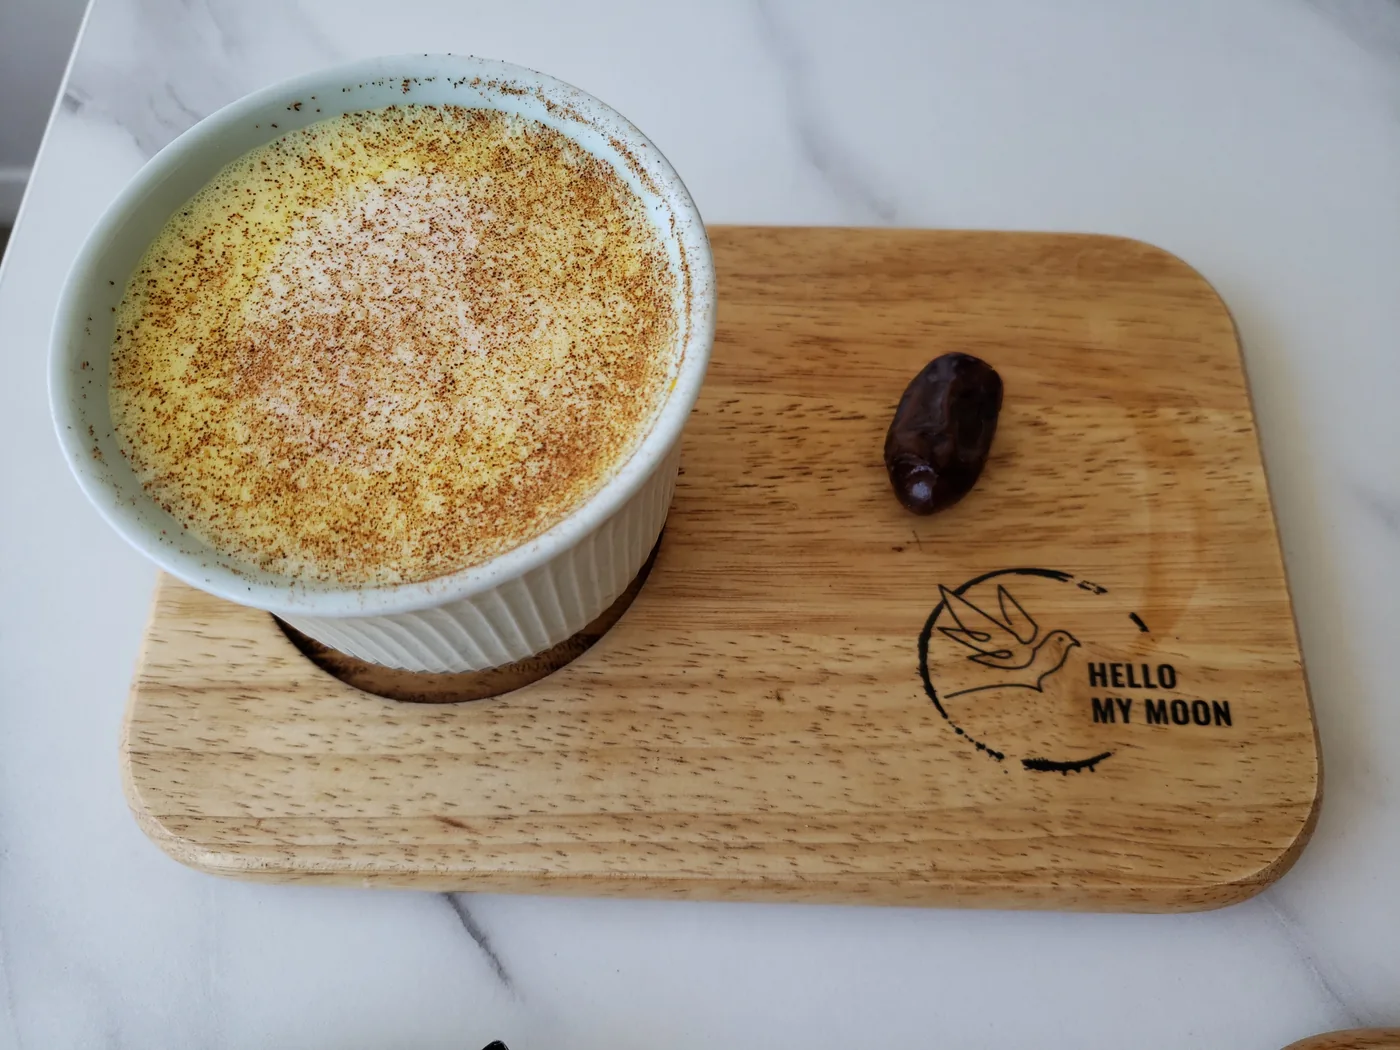
A teaspoon is a small dose of minerals. The more interesting question is how people actually eat it.
Golden milk and tea
Tea and golden milk are the two easiest ways to use turmeric. For golden milk, warm a cup of milk or coconut milk with one teaspoon of turmeric powder or a thumb of grated fresh root and a pinch of black pepper, simmer five to ten minutes, strain, and sweeten with honey. For tea, steep a teaspoon of grated root in a cup of hot water for ten minutes.
The fat in milk and the pepper are not decoration. Curcumin dissolves in fat and not in water, and it is poorly absorbed from the gut. A tea made with water alone pulls very little of it, which is why cooks across Asia fry turmeric in oil or simmer it in milk before it reaches the plate.
Leaves and flowers in the kitchen
The leaves are a food in their own right. In Goa, cooks steam rice and coconut-jaggery cakes called patoleo inside turmeric leaves. In Indonesia, turmeric leaves form the base of Minang curries such as rendang and sate padang.
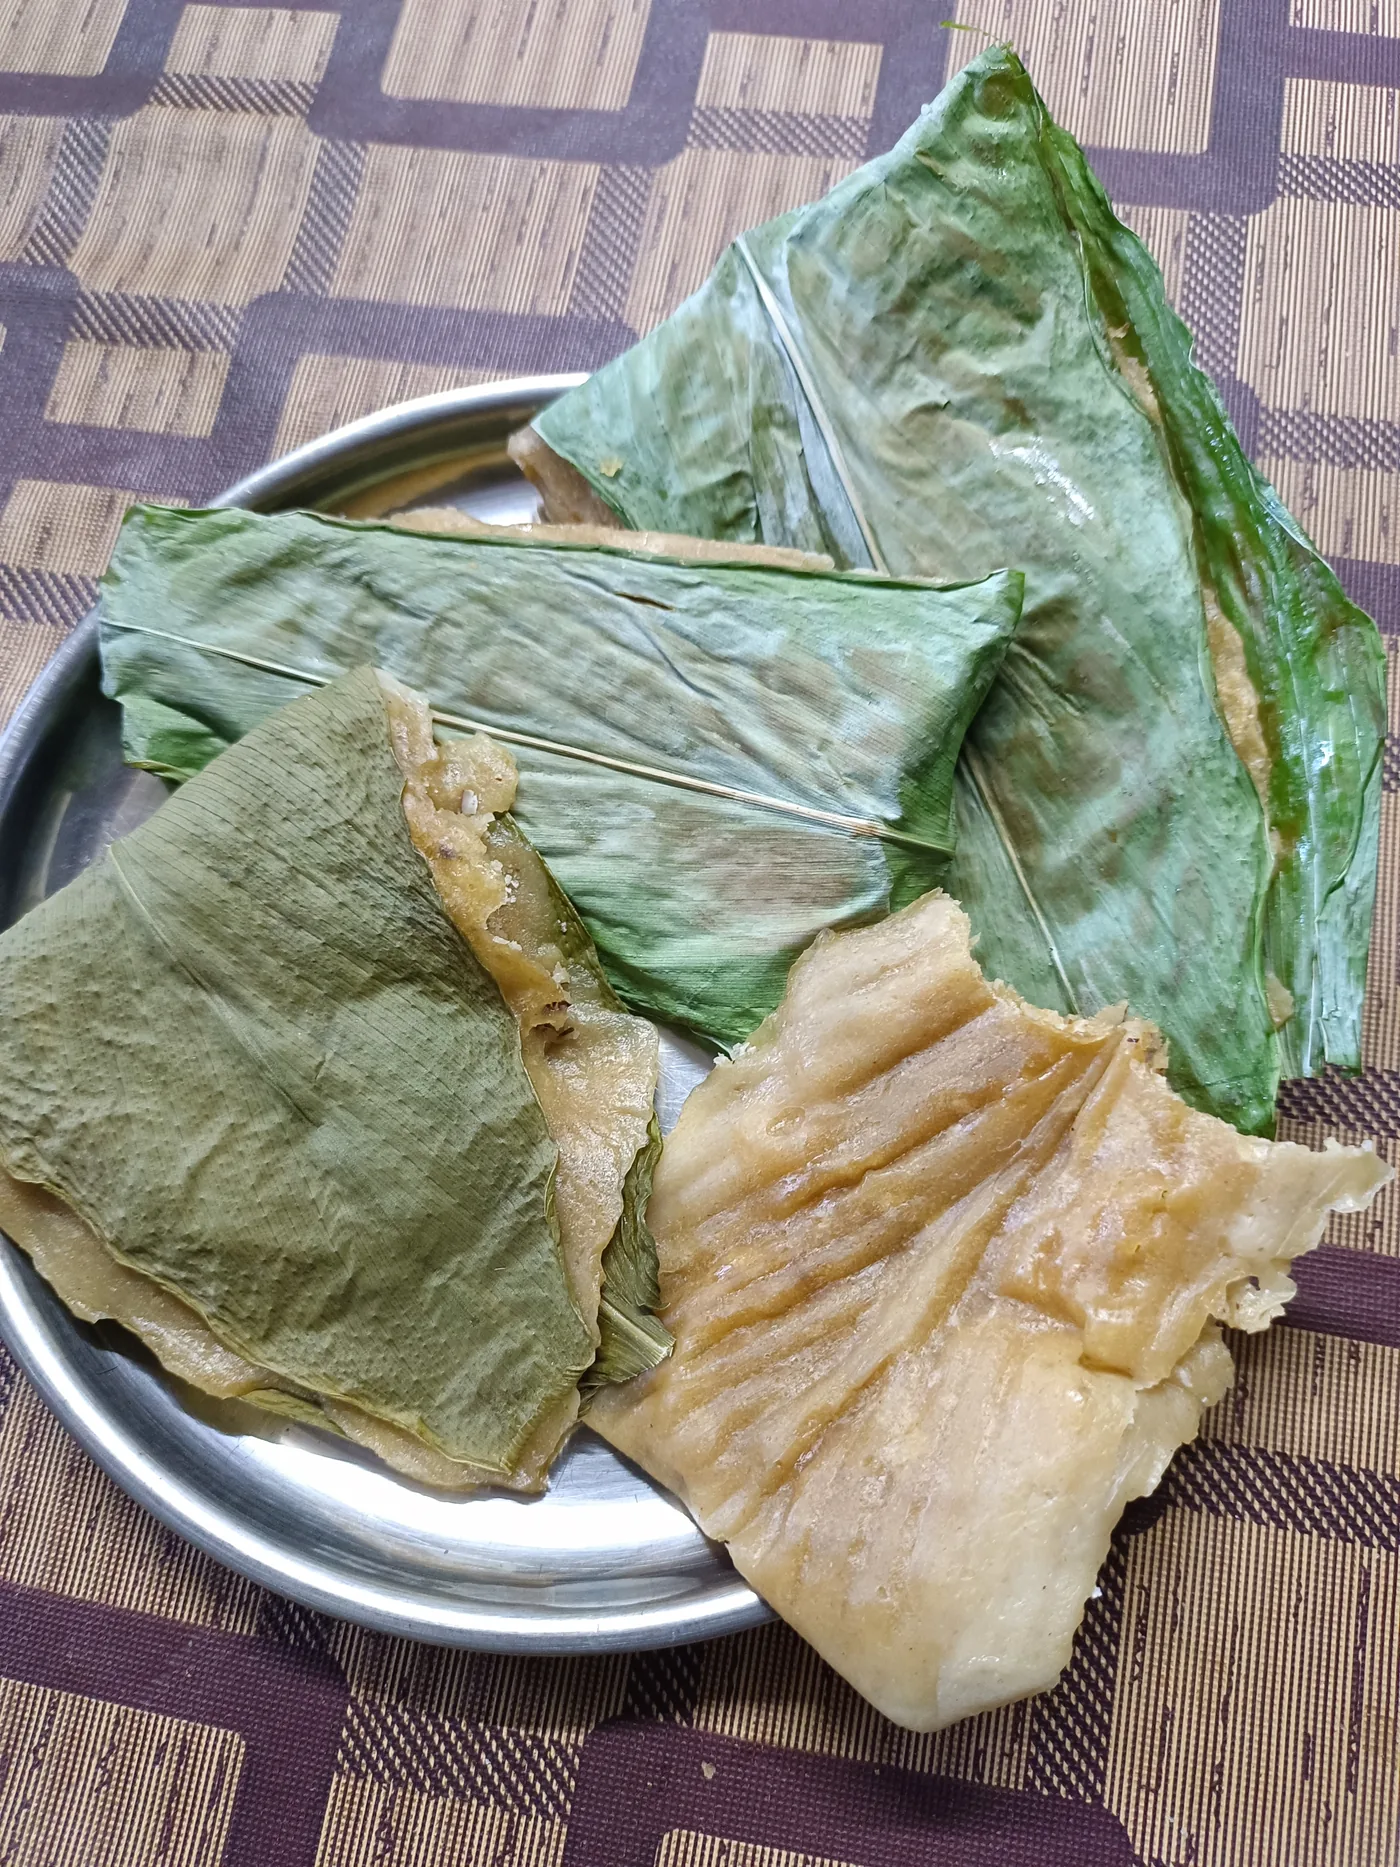
Use the leaf as a wrapper, like a banana leaf, or tear it into a pot of curry for aroma, and remove it before serving. The flower is mostly ornamental and has no established culinary tradition, so enjoy it for the garden and leave it for the pollinators.
What the research shows
The National Center for Complementary and Integrative Health reports initial positive evidence from meta-analyses of turmeric and curcumin for osteoarthritis, with a need for higher-quality trials. It also reports early evidence for fatty liver disease and for mouth inflammation after cancer treatment, and it finds too little evidence for other conditions. A 2016 meta-analysis of turmeric extracts found improvement in joint pain in arthritis, and the European Medicines Agency accepts traditional use of the root for mild digestive complaints.
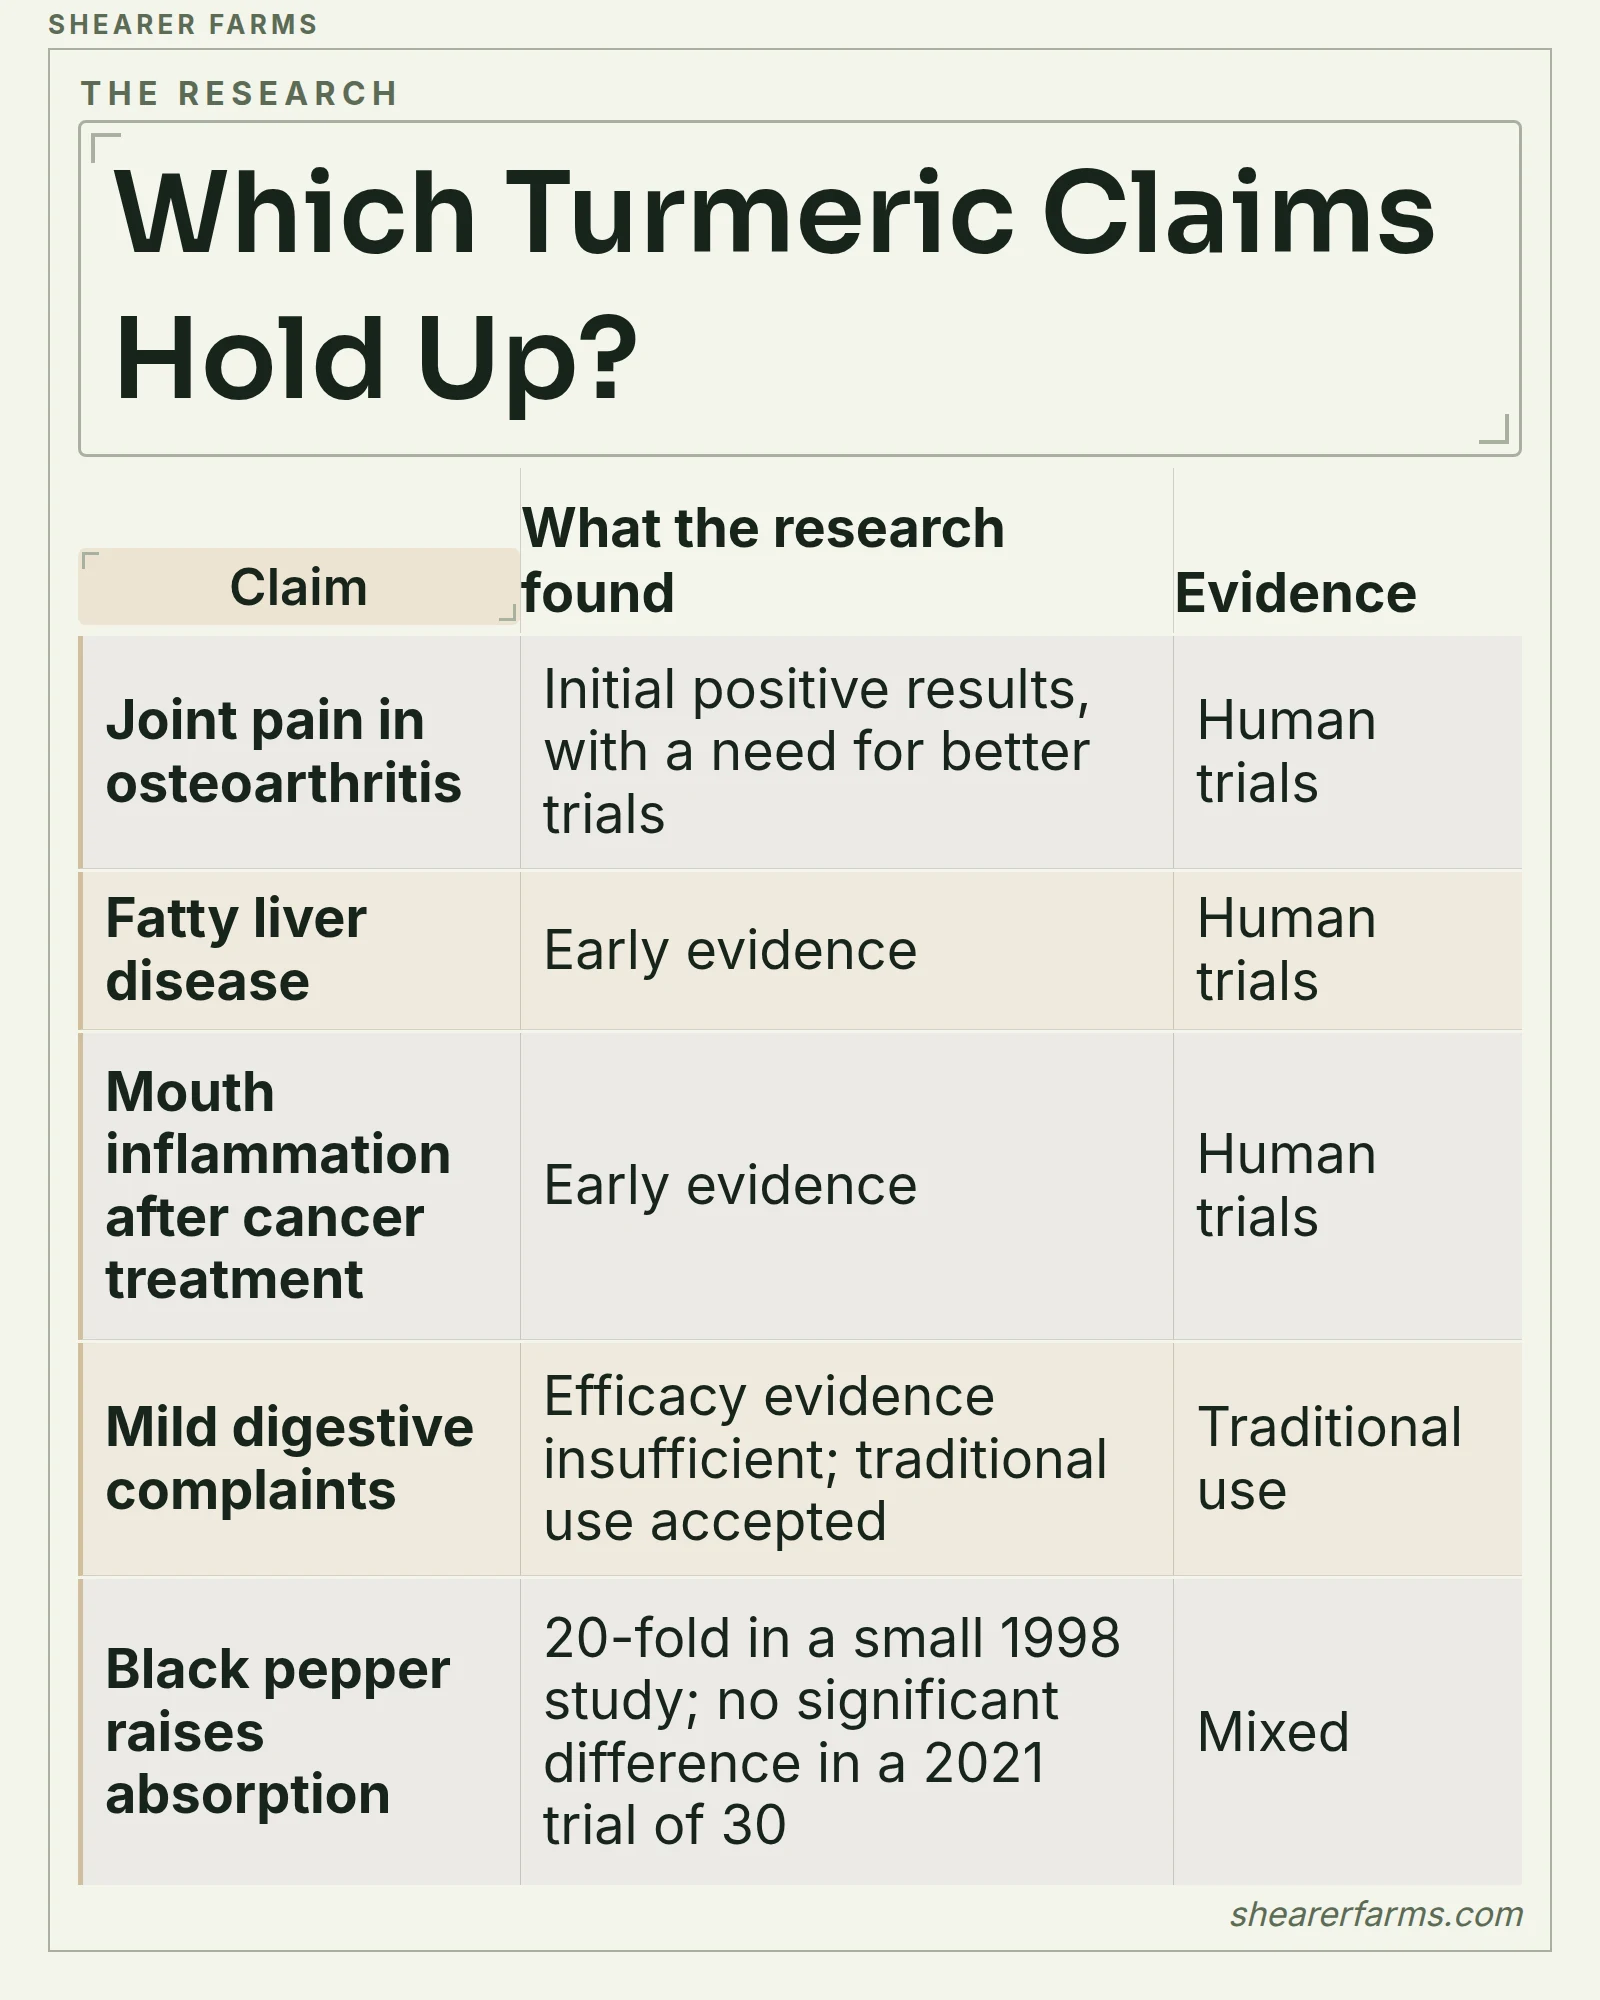
Outside joint pain the evidence is thin. The research that matters most for a cook is whether black pepper really helps you absorb curcumin.
The Absorption Problem
Curcumin is poorly absorbed from the gut, quickly metabolized by the liver and quickly cleared from the body. That is why cooks pair turmeric with fat and black pepper. One small 1998 trial reported that 20 milligrams of piperine, the active compound in pepper, raised blood curcumin about 20-fold in a small group of volunteers, and a 2021 trial of 30 people found no significant difference with a standardized extract. Treat the pepper trick as helpful in the kitchen and unproven as a supplement strategy.
Researchers also warn that curcumin behaves badly in laboratory screens, flagging it as a pan-assay interference compound that produces false positives. That does not erase the research, but it means test-tube results about curcumin deserve a careful reading, and the human trials above carry the real weight.
Compounds in the Root, Leaves and Flower
The root
The root is the best studied part. Its color comes from the curcuminoids, led by curcumin, and its aroma comes from a volatile oil rich in turmerones. Commercial turmeric powder averages about 3.1 percent curcumin by weight, and the oil runs near 4 percent. The USDA analysis gives the rest, with starch and other carbohydrates making up most of the weight.
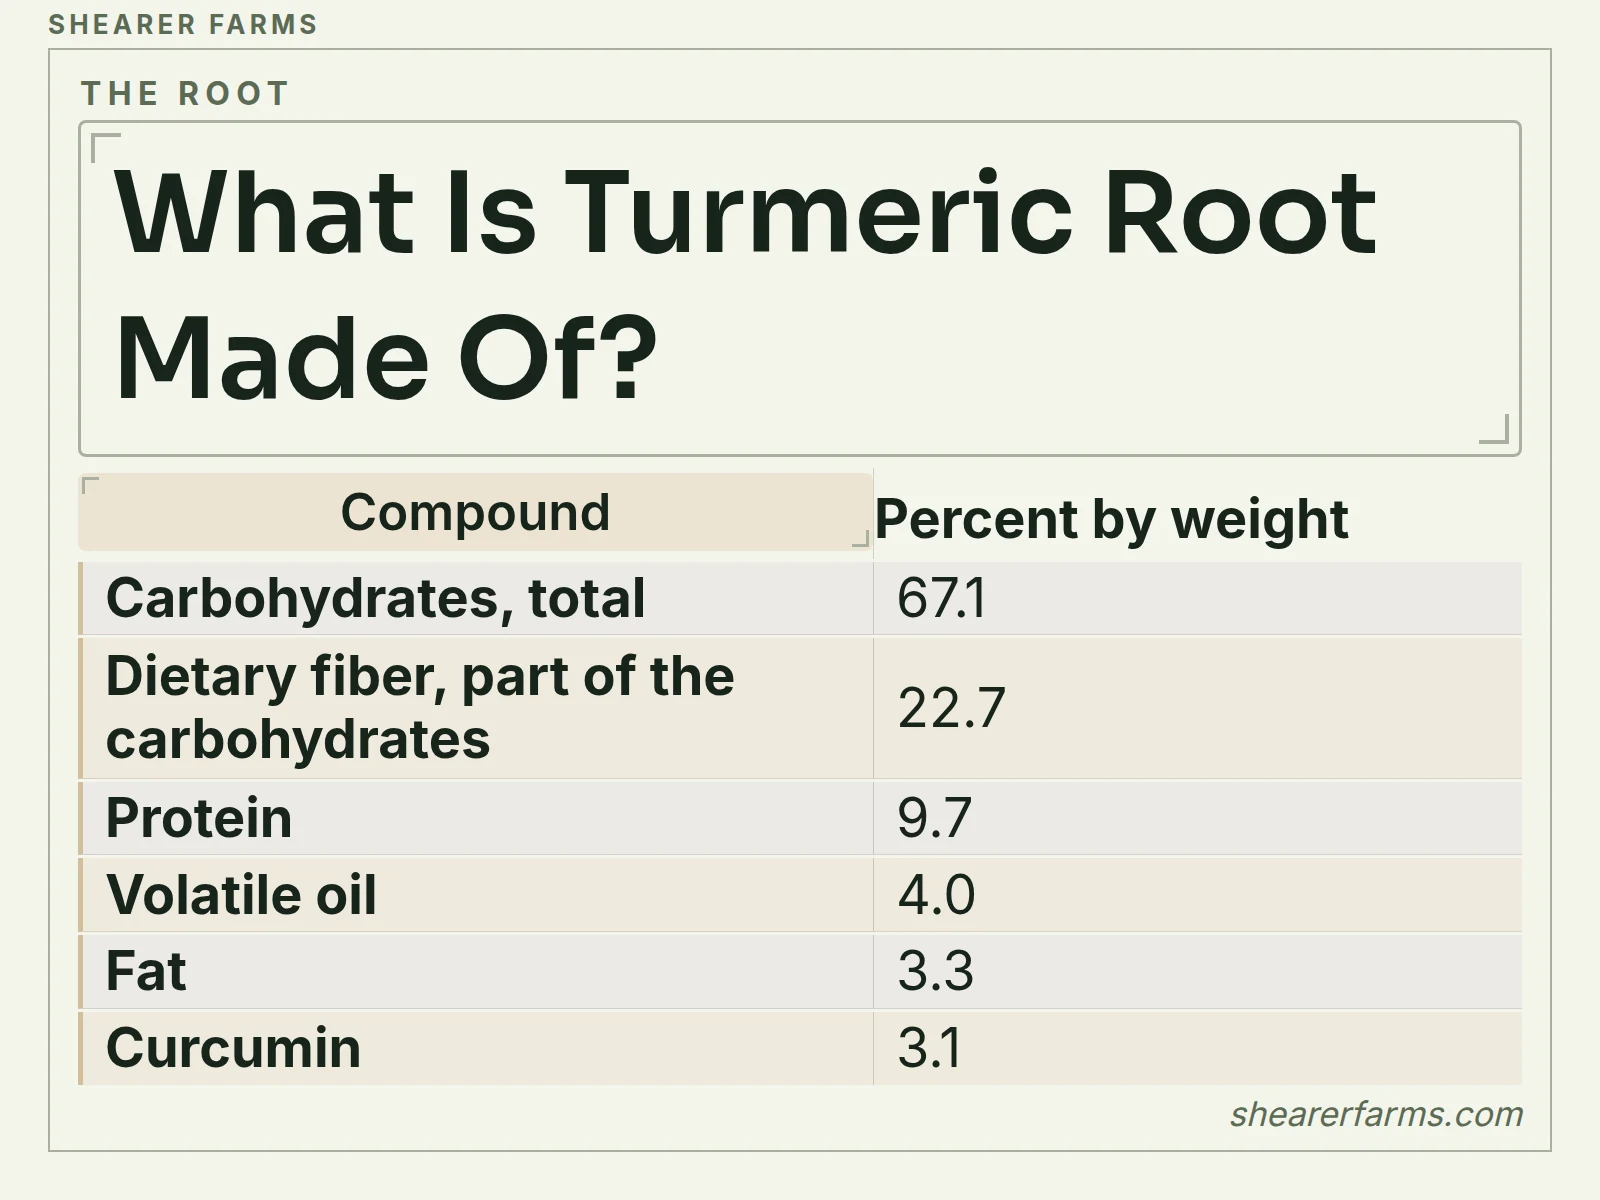
Curcumin is a small share of the root: a gram of ground root carries about 31 milligrams of it. The oil is mostly three related molecules, ar-turmerone, alpha-turmerone and beta-turmerone, and their share shifts with variety, drying and age. In one Indian study ar-turmerone made up 8 to 36 percent of the oil, and fresh root holds far more alpha-turmerone than dried.
That is the root, and it is only one of three parts of the plant that carry useful compounds. The leaves and the flower have their own chemistry, and it looks very little like the root.
The leaves
The leaves are chemically a different plant. Their oil is rich in monoterpenes, light aromatic compounds, instead of the heavy turmerones of the root. Leaf oil holds 61 compounds, with alpha-phellandrene at 53 percent, terpinolene at 12 percent and 1,8-cineole at 11 percent. A Vietnamese sample, in contrast, was richer in 1,8-cineole and p-cymene, so the recipe depends on variety and where the plant grew. Dried leaves carry roughly 1 to 1.5 percent oil, against about 5 percent in the dried root.
The flower
The flower is the least studied part, and the research that exists is thin. One 2016 measurement found a small amount of curcumin in the flower, 3.87 micrograms per gram, and a good load of phenolic antioxidants, 210 milligrams per 100 grams. A 2002 study of flower oil found p-cymen-8-ol as its largest component at 26 percent. Reviews of the genus agree that leaf and flower oils lean toward monoterpenes while root oils lean toward sesquiterpenes.
| Plant part | Main compounds | What is known |
|---|---|---|
| Root | Curcuminoids, turmerones, starch | Best studied; color, aroma and most of the research |
| Leaves | Alpha-phellandrene, terpinolene, 1,8-cineole | Aromatic oil; varies by variety and origin |
| Flower | Phenolics, monoterpenes, p-cymen-8-ol | Least studied; small, single-location studies |
The gap is an opportunity. Almost no one writes about the leaf and flower compounds, and a grower with a pot of turmeric has access to the whole plant, not just the root that every study measures.
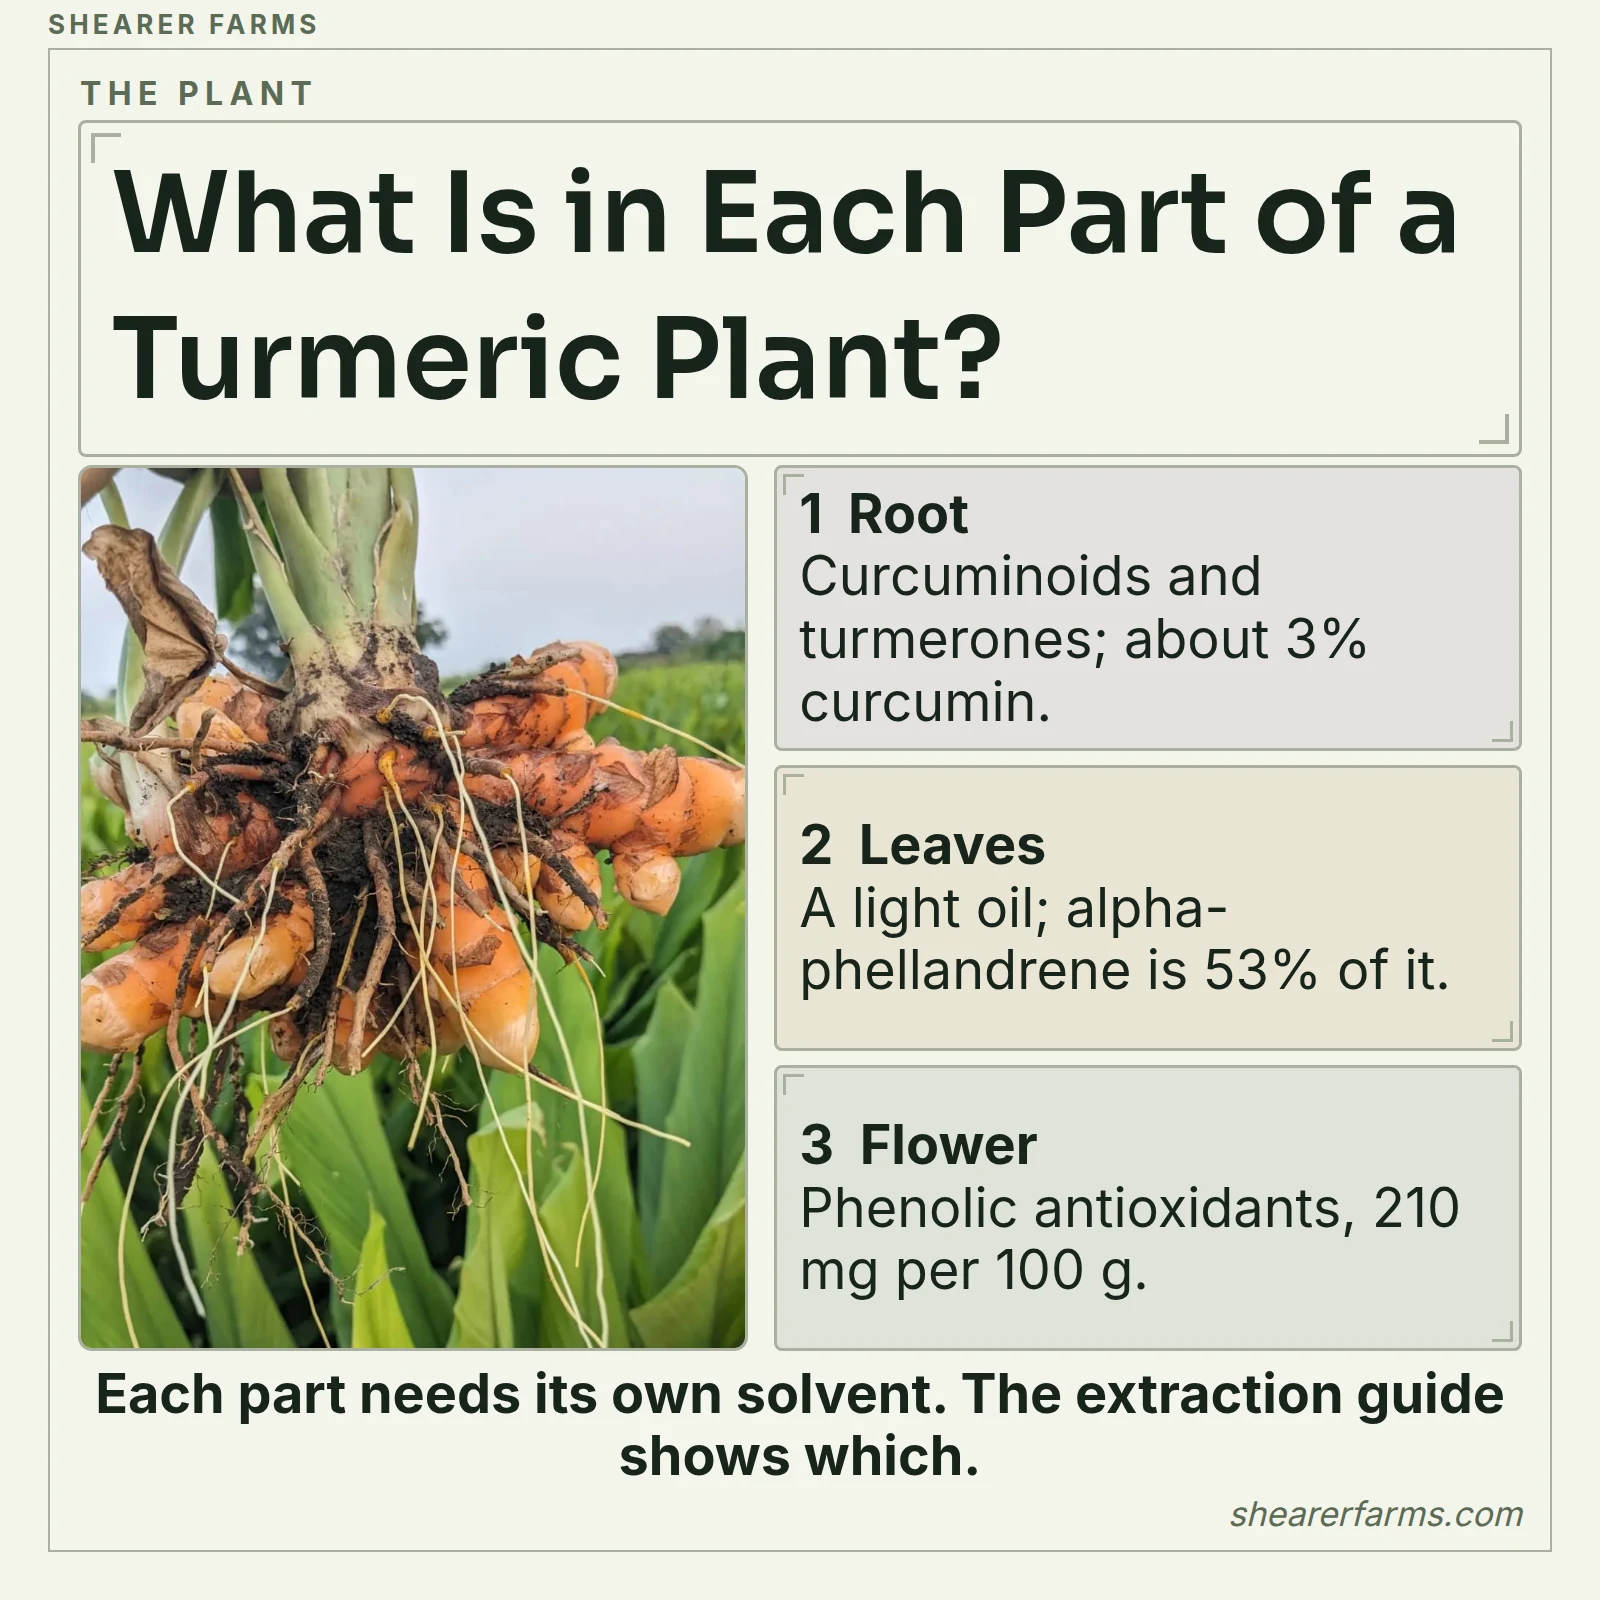
Each part of the plant needs its own approach, which is why the extraction guide treats the root, the leaves and the flower as three separate jobs.
Isomers and why they matter
Isomers are molecules with the same atoms arranged differently, and in turmeric they are everywhere. Alpha-turmerone and beta-turmerone are isomers of each other. Curcumin flips between two forms, called keto and enol, in solution, and light breaks it down into smaller molecules such as vanillin and ferulic acid. In the root these forms sit side by side, which is part of what makes a whole extract different from a single isolated molecule.
The pharmaceutical industry cares about isomers because the body treats them differently. Esomeprazole, the acid reducer, is the single S-isomer of omeprazole, and naproxen is sold as the single S-enantiomer of the molecule. The FDA published a policy in 1992 on how to develop drugs that are single stereoisomers, because one isomer can be the medicine while its mirror image is inactive or worse.
Why extracts concentrate and last
An extract pulls the compounds out of the root with a solvent such as alcohol, glycerin or oil, and then concentrates them. The ratio on a label tells you how much: in a 10:1 extract, ten parts of dried root went into every one part of finished extract, so the extract is ten times more concentrated by weight. A dried root is only about 3 percent curcumin, and an extract starts from the full spectrum of everything the solvent can carry.
Extracts also last. An alcohol tincture at 25 percent alcohol or stronger is a hostile place for mold and bacteria, so herbalists expect it to keep for years in a sealed jar, while a powdered root loses its volatile oil faster than the whole root does. Curcumin itself is fragile in light, and 82 percent of free curcumin breaks down after 28 days in natural light, so store any extract in dark glass in a cupboard.
Complete stinging nettle cultivation guide covering Urtica dioica botany, nutrient-rich leaf harvest, iron and mineral content.
For a More In-Depth Read, Click HereSafety and Precautions
Turmeric in food has a long record of safety, and the cautions apply mostly to concentrated supplements. Check these four before you take more than a spoon a day.
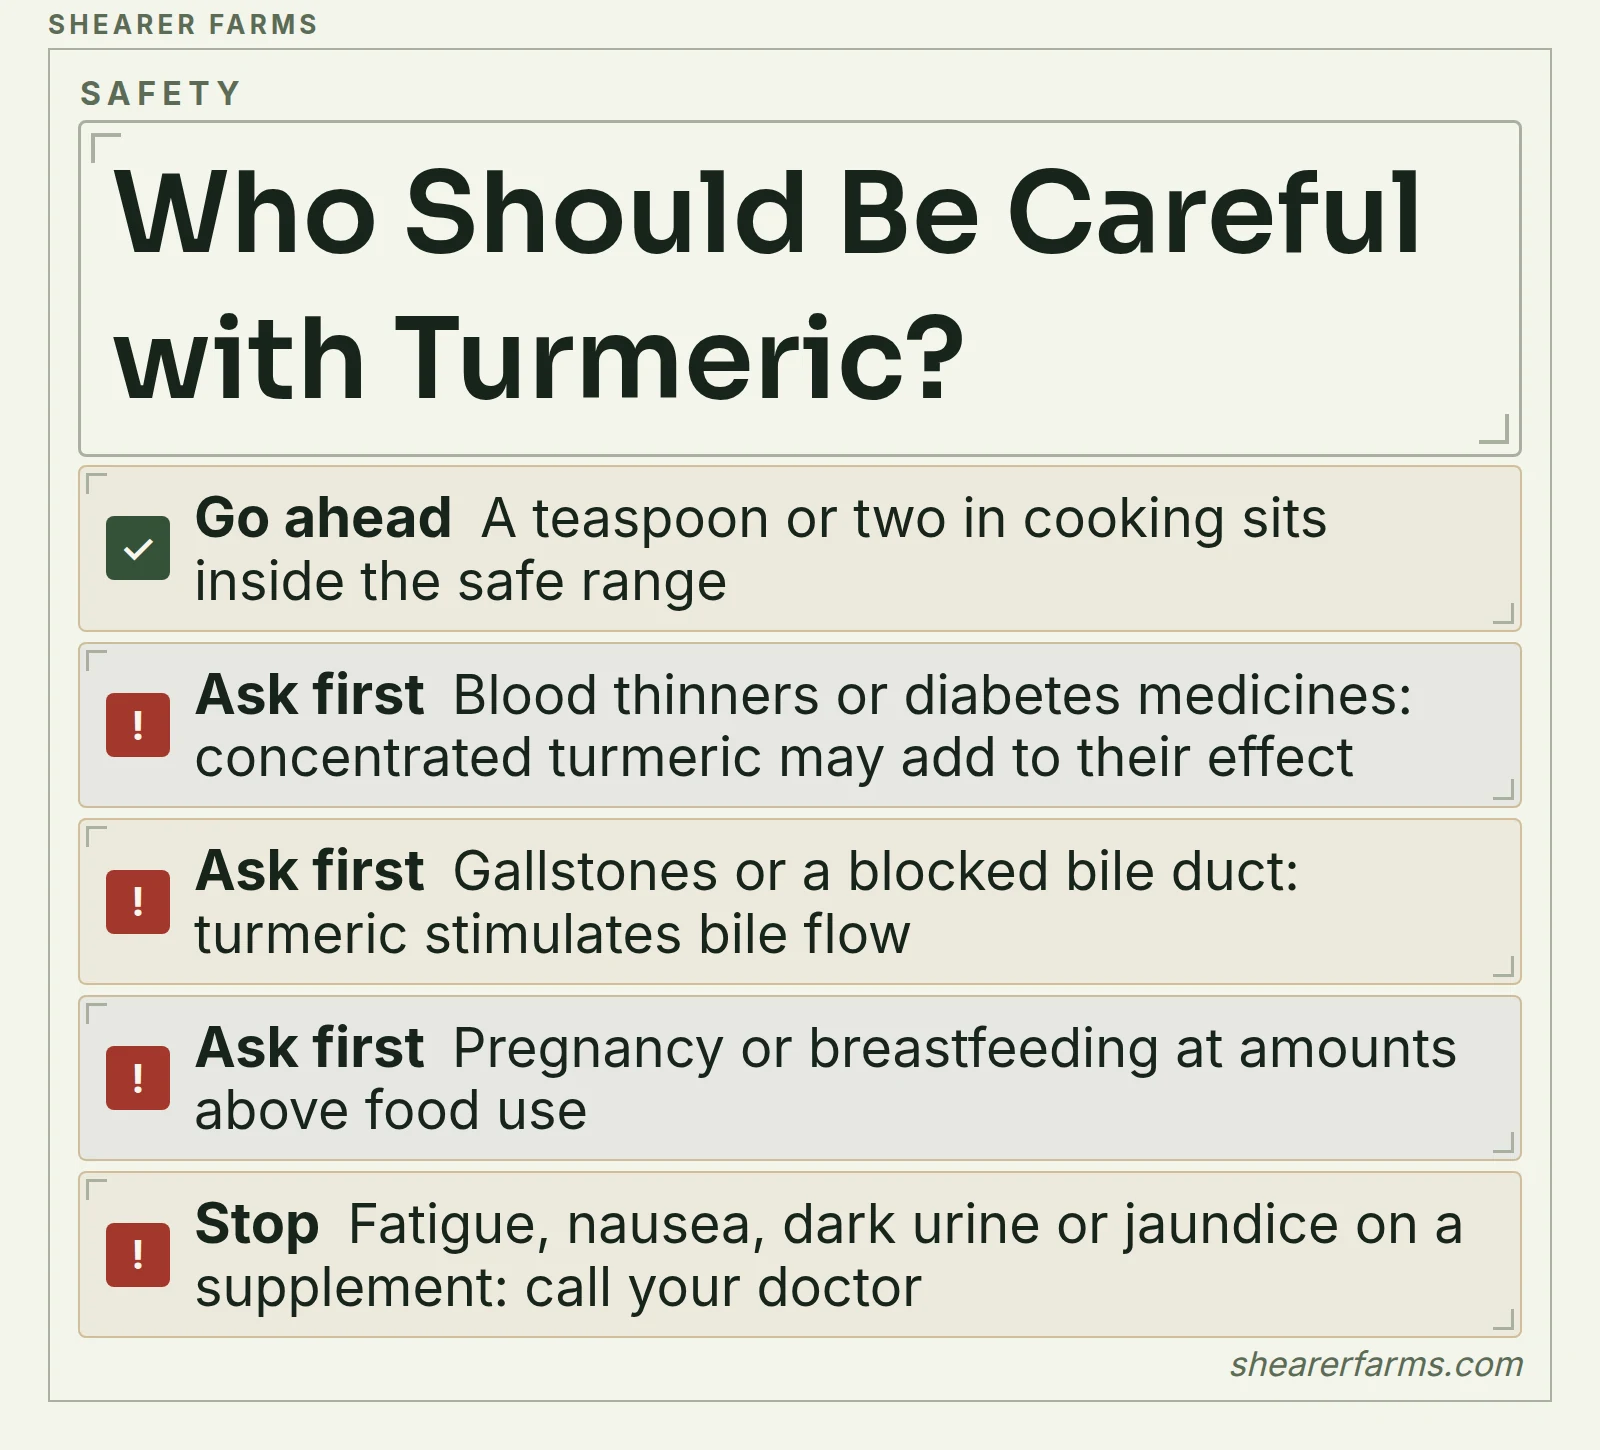
Culinary amounts, a teaspoon or two in cooking, sit well inside the safe range. Conventional oral turmeric or curcumin is likely safe at recommended amounts for up to two or three months, and the usual side effects are stomach upset, nausea, acid reflux, diarrhea or constipation.
References
- Hewlings and Kalman, Foods (2017), a review of curcumin and human health.
- Nelson et al., Journal of Medicinal Chemistry (2017), the chemistry of curcumin, including its behavior in laboratory screens and its content in commercial powders.
- Daily et al., Journal of Medicinal Food (2016), turmeric extracts and curcumin for joint arthritis, a meta-analysis.
- Anand et al., Molecular Pharmaceutics (2007), the bioavailability of curcumin.
- Shoba et al., Planta Medica (1998), the effect of piperine on curcumin levels in rats and volunteers.
- UK Committee on Toxicity, statement on turmeric and curcumin supplements, including the 2021 trial of piperine with a standardized extract.
- Prasad et al., Cancer Research and Treatment (2014), delivery, absorption and metabolism of curcumin.
- Ravindran, Babu and Sivaraman (eds.), Turmeric: The Genus Curcuma (CRC Press, 2007), agronomy and processing.
- USDA FoodData Central, Spices, turmeric, ground (FDC 172231), the nutrient figures.
- National Center for Complementary and Integrative Health, Turmeric, evidence and safety.
- University of Florida IFAS Gardening Solutions, Turmeric, planting, spacing and harvest.
- European Medicines Agency, Curcumae longae rhizoma, the herbal monograph.
- Wikipedia, Turmeric, history, composition and leaf use, with the sources it cites.
- Indian Spices Board, production statistics.
- Indian curing and drying studies of boiled and sliced turmeric rhizomes (ICAR).
- Pot size and manure trial on turmeric growth and yield, Philippines.
- Composition of the essential oil from the leaves of Curcuma longa, Kasur variety.
- Antioxidant efficacy and curcumin content of the turmeric flower (2016).
- Essential oil of Curcuma longa rhizomes, composition, yield variation and stability, Quimica Nova.
- Stability of free curcumin in light, a study of immobilized curcumin.
- FDA, policy statement on the development of new stereoisomeric drugs (1992).
- Tamil Nadu Agricultural University, turmeric varieties: CO 1, CO 2, BSR 1, BSR 2, BSR 3, Erode local and Salem local, with fresh yield, curcumin and pest tolerance.
- Food Safety Works, the golden spice from North East India: curcumin in Lakadong turmeric compared with other Indian types.
- Comparison of Curcuma caesia Roxb. with other commonly used Curcuma species by HPTLC, Journal of Pharmacognosy and Phytochemistry (2013).
- Determination of optimum size of seed rhizome on growth, yield, quality and profitability of turmeric, a Lakadong trial at Imphal, Plant Archives.
Common questions
What is turmeric?
A knob of turmeric from the grocery store is a planting piece. Set it in warm, damp soil in spring and by late fall it has multiplied into a clump of fresh orange root, with tall leaves above it that you can cook with too. Turmeric has been farmed for at least 4,000 years, it sits in the medicine chest and the spice rack on three continents, and it is one of the few kitchen spices you can grow from a single scrap.
How do I grow turmeric?
Ideal growing conditions. Turmeric wants what a monsoon forest floor gives it: warmth, shade from the afternoon sun, loose rich soil and steady moisture. Keep those four right and the plant forgives almost everything else, and the targets are easy to hit in any kind of garden. USDA hardiness zones: 8 to 11 outdoors; any zone in a pot or greenhouse. Temperature: 20 to 30 °C (68 to 86 °F), nothing below 10 °C (50 °F).
How do I propagate turmeric?
Turmeric is grown for two different crops, the root (the rhizome that is eaten or extracted) and the seed rhizomes that become next year's plants, and the work that raises one is not quite the work that raises the other. Both start with a plant that is warm, fed and never short of water. The root swells in loose, compost-rich soil with steady moisture and shade from the afternoon sun, so water when the top inch is dry and feed with compost every month through summer, because turmeric is a heavy feeder. Cold soil stops growth, so keep the soil above 20 °C (68 °F) when the pieces sprout. Plant pieces 15 inches apart.
When should I harvest turmeric?
Wait for the plant to tell you. When the leaves yellow and fall over, usually in late fall or early winter, the plant is going dormant and the rhizomes are full. That is 8 to 10 months after planting. In places with frost, harvest before the first frost whatever the leaves look like. Loosen the soil around the clump with a garden fork and lift the whole mass.
What is the active compound in turmeric?
The root is the best studied part. Its color comes from the curcuminoids, led by curcumin, and its aroma comes from a volatile oil rich in turmerones. Commercial turmeric powder averages about 3.1 percent curcumin by weight, and the oil runs near 4 percent. The USDA analysis gives the rest, with starch and other carbohydrates making up most of the weight. Curcumin is a small share of the root: a gram of ground root carries about 31 milligrams of it.
Is turmeric safe?
Turmeric in food has a long record of safety, and the cautions apply mostly to concentrated supplements. Check these four before you take more than a spoon a day. Culinary amounts, a teaspoon or two in cooking, sit well inside the safe range. Conventional oral turmeric or curcumin is likely safe at recommended amounts for up to two or three months, and the usual side effects are stomach upset, nausea, acid reflux, diarrhea or constipation.
 Growing
 Growing
 Growing
 Growing
 Growing
 Growing
 Growing
 Growing
 Growing